


ExactFlow Leave Management Page User Guide
The Leave Management page in ExactFlow helps employees and HR teams easily apply for, track, and approve leave requests. Everything related to leave balances, requests, and approvals is managed from one clean dashboard.
How to Open the Leave Management Page
Log in to your ExactFlow account.
From the left sidebar, click HR Agent.
Select Leave Management.
The Leave Management dashboard will open.
You are now on the main Leave Management page.
Leave Management Dashboard Overview
The dashboard is divided into clear sections so you can quickly understand your leave status.
My Leave Balance Section
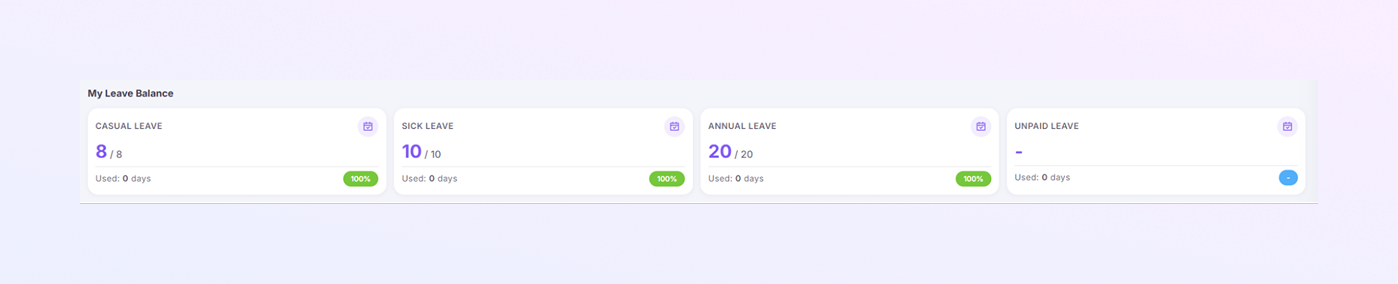
At the top of the page, you will see My Leave Balance. This section shows all available leave types and how many days you can still use.
-
Casual Leave
Shows the total casual leave assigned to you
Displays how many days are used
Shows remaining balance
Example:
8 / 8 means you have all casual leave days available
Used: 0 days means none are used yet
-
Sick Leave
Used for health-related reasons
Shows total sick leave allowed
Displays remaining days
-
Annual Leave
Used for planned vacations or long breaks
Displays total annual leave assigned
Shows the remaining balance
-
Unpaid Leave
Used when paid leave is not available
Does not usually have a fixed limit
Shows usage if applied
This helps you plan medical or emergency leave easily.
You can check this before planning holidays.
This section helps you understand unpaid leave usage clearly.
Apply Leave Button
At the top-right corner, you will see the Apply Leave button.
Click this button when you want to request leave.
How to Apply for Leave
Click Apply Leave
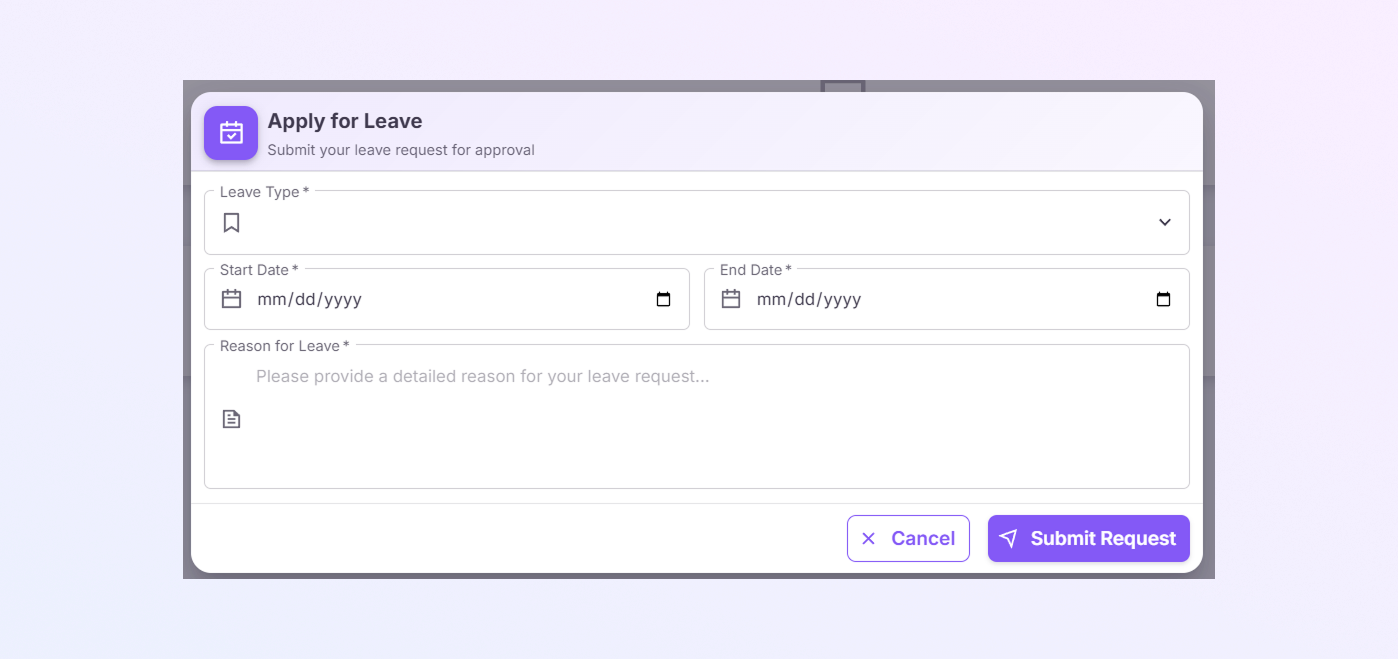
A pop-up window titled Apply for Leave will appear
This form is used to submit your leave request.
Apply for Leave Form
-
Leave Type (Required)
Click the dropdown
Select the type of leave:
Casual Leave
Sick Leave
Annual Leave
Unpaid Leave
-
Start Date (Required)
Click the calendar icon
Select the date when your leave starts
-
End Date (Required)
Click the calendar icon
Select the date when your leave ends
-
Reason for Leave (Required)
Type a short and clear reason for your leave
Example reasons:
Personal work
Medical appointment
Family matter
Vacation
Choose the correct leave type before continuing.
This is the first day you will be absent.
This is the last day of your leave.
Providing a clear reason helps managers approve requests faster.
Submit or Cancel
Click Submit Request to send your leave for approval
Click Cancel if you do not want to submit the request
Once submitted, the request is sent to the approver.
My Leaves Section
This section shows all leave requests that you have applied for.
Approved leave requests
Pending leave requests
Rejected leave requests (if any)
If no leave is applied yet, you will see: “No leave requests found.”
This helps you track your leave history easily.

Leaves Pending Approval Section
This section is mainly for HR or managers.
It shows:
Leave requests are waiting for approval
Requests submitted by team members
If there are no pending requests, you will see: “No leaves pending approval.”
This keeps approval work organized and transparent.

Summary
The ExactFlow Leave Management page allows you to:
View all leave balances in one place
Apply for leave in just a few steps
Track your leave requests
Manage approvals efficiently (for HR)
This module makes leave management simple, clear, and stress-free for everyone.