

ExactFlow Assign Users Page User Guide
The Assign User to Department page allows you to connect users with one or more departments inside Exact Flow. This helps control access, organize teams, and make sure each user works under the correct department.
Operational Agents mainly use this page to:
Assign users to departments
View current user-department assignments
Remove users from departments when needed
How to Open the Assign User to Department Page
Log in to your Exact Flow account.
From the left sidebar, click Operational Agent.
Under Operational Agent, click Department Management.
Select Assign to User.
You will now see the Assign Users to Departments page.
Assign User to Department Section
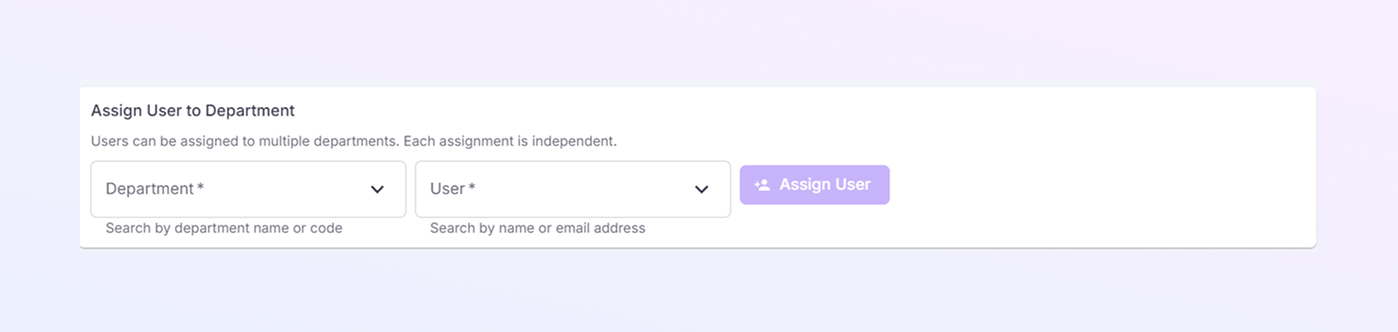
This section is located at the top of the page. It is used to assign a user to a selected department.
Information Message
You will see a short note that explains:
-
A user can be assigned to multiple departments
-
Each assignment works independently
This is helpful when a user works in more than one team.
Department Dropdown
-
Click the dropdown to select a department
-
You can search by:
-
Department Name
-
Department Code
-
-
Human Resources (HR)
-
Software Development Department (SOF)
-
Sales Department (SD1)
Examples:
This makes it easy to find the right department, even if the list is long.
User Dropdown
-
Click this dropdown to select a user
-
You can search by:
-
User name
-
Email address
-
This helps you quickly find the correct person without scrolling through the full list.
Assign User Button
-
Click this button after selecting:
-
A department
-
A user
-
-
The user is assigned to the selected department
-
The assignment appears in the list below
Once clicked:
Current Assignments Section
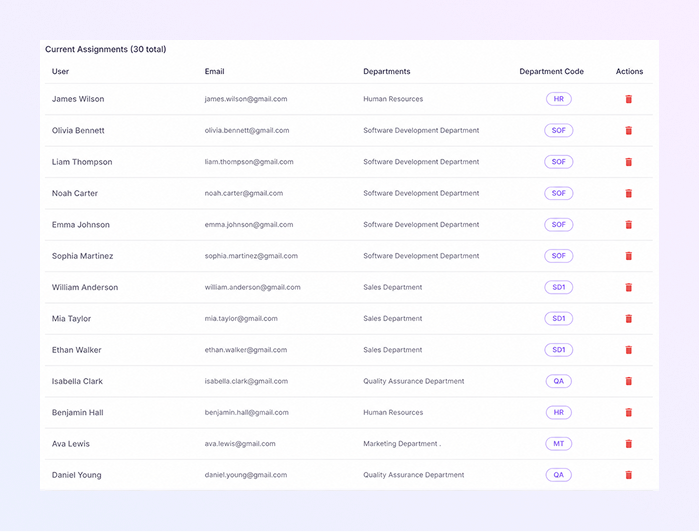
This section shows all existing user-department assignments. It helps you:
-
Track who is assigned to which department
-
Manage department access easily
Assignments Table
Each row represents one user assigned to one department.
-
User
-
Displays the full name of the user
-
Helps quickly identify the person
-
-
Email
-
Shows the user’s registered email address
-
Useful for verification and support purposes
-
-
Departments
-
Displays the department name the user is assigned to
-
Example:
-
Human Resources
-
Software Development Department
-
Sales Department
-
-
-
Department Code
-
Shows a short department code inside a label
-
Example:
-
HR
-
SOF
-
SD1
-
QA
-
This helps in quick identification and system reference.
-
-
Actions
Delete Icon
-
Used to remove a user from a department
-
Click this icon if:
-
A user changes teams
-
A user no longer needs department access
-
Removing an assignment does not delete the user. It only removes their department connection.
-
Summary
From the Assign User to Department page, you can:
Assign users to one or more departments
View all current assignments in one place
Remove users from departments easily
Keep department access clean and organized