


ExactFlow Create Task Page User Guide
The Task Management area in Exact Flow helps teams plan work, assign responsibilities, and track progress in an organized way. Operational Agents use this module to create projects, divide them into sections, and assign tasks to users with clear timelines.
How to Open the Task Management Page
Log in to your Exact Flow account.
From the left sidebar, click Operational Agent.
Click Task Management.
Select Create Task.
You will see the Task Management screen with tabs at the top.
Task Management Tabs Overview
At the top of the page, you will find three tabs:
-
Create Task
-
Create Project
-
Create Section
Each tab has a different purpose but works together.
Create Task Tab
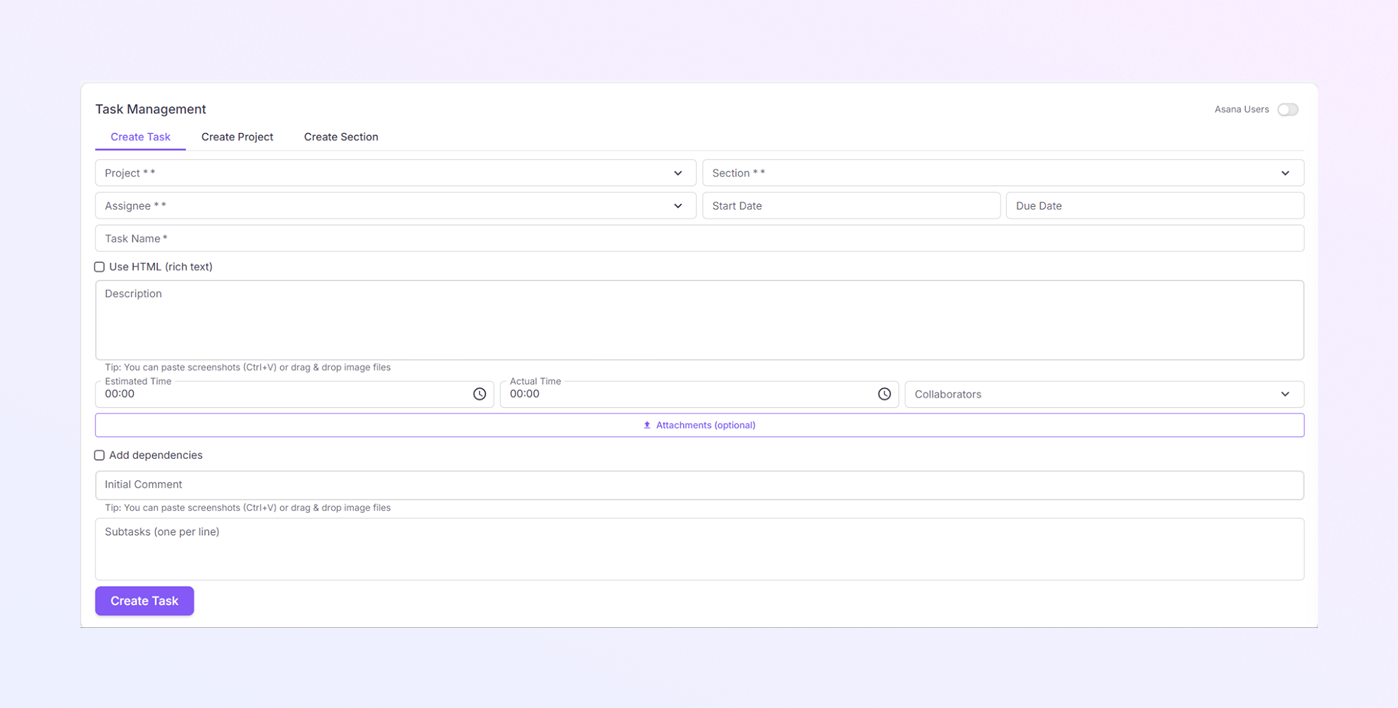
The Create Task tab is used to create and assign individual tasks to users.
For Asana Users
-
Project *: Select the project where the task belongs. Tasks cannot exist without a project.
-
Section *: Choose the section inside the project. Helps group tasks logically.
-
Assignee *: Select the user responsible for the task. The assignee will see this task in their task list.
-
Start Date: Set when the task should begin. Useful for planning upcoming work.
-
Due Date: Set the deadline for the task. Helps track delays and priorities.
-
Task Name *: Enter a short, clear task title.
-
Use HTML (Rich Text): Enable this option if formatting is needed. Allows bold text, lists, and better layout.
-
Description: Explain task details clearly. You can paste screenshots (Ctrl + V) or drag and drop image files.
-
Estimated Time: Enter the expected time to complete the task. Helps with workload planning.
-
Actual Time: Shows real time spent on the task. Useful for performance tracking
-
Collaborators: Add users who will support the task. They can view and comment on the task.
-
Attachments (Optional): Upload files related to the task.
-
Add Dependencies: Enable if this task depends on another task. Helps manage task order properly.
-
Initial Comment: Add notes or instructions at task start. Supports screenshots and file uploads.
-
Subtasks: Add smaller steps (one per line). Makes large tasks easier to complete.
-
Create Task Button: Click Create Task to save. The task is added to the project, and the assigned users are notified.
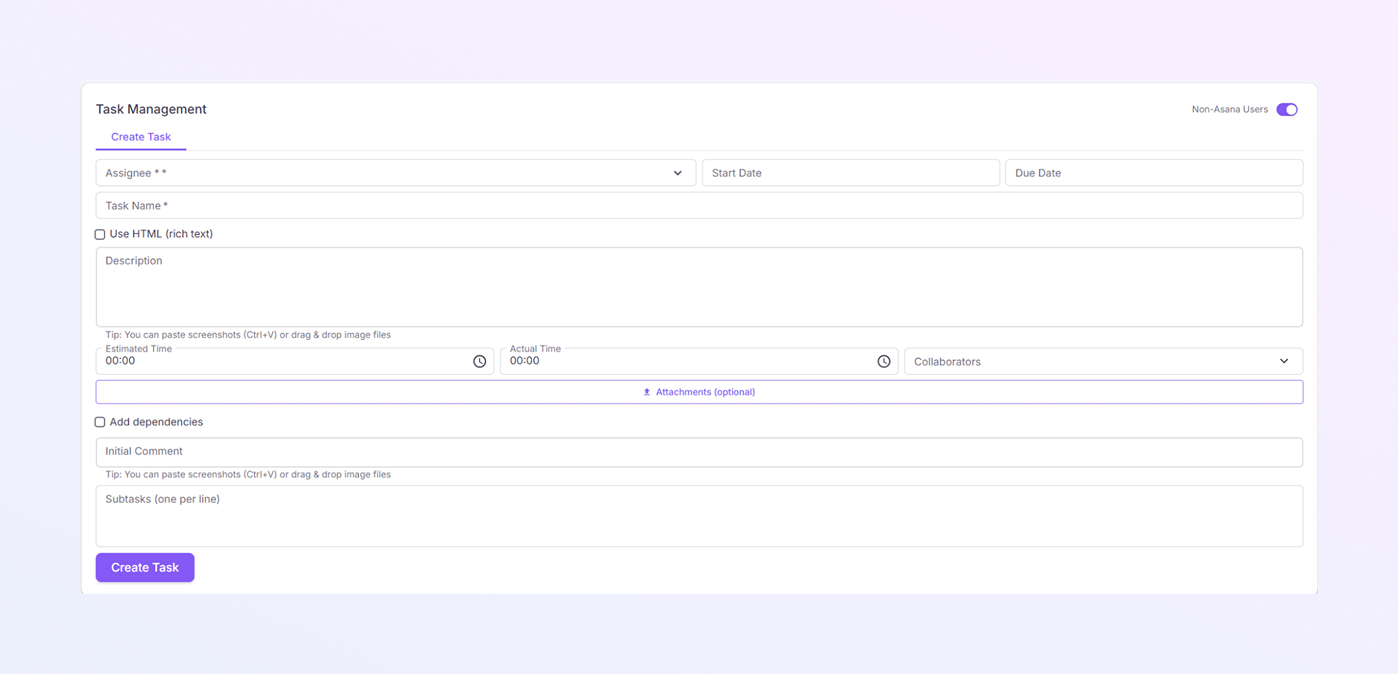
For Non-Asana Users:
-
Assignee *: Select the user responsible for the task. The assignee will see this task in their task list.
-
Start Date: Set when the task should begin. Useful for planning upcoming work.
-
Due Date: Set the deadline for the task. Helps track delays and priorities.
-
Task Name *: Enter a short, clear task title.
-
Use HTML (Rich Text): Enable this option if formatting is needed. Allows bold text, lists, and better layout.
-
Description: Explain task details clearly. You can paste screenshots (Ctrl + V) or drag and drop image files.
-
Estimated Time: Enter the expected time to complete the task. Helps with workload planning.
-
Actual Time: Shows real time spent on the task. Useful for performance tracking
-
Collaborators: Add users who will support the task. They can view and comment on the task.
-
Attachments (Optional): Upload files related to the task.
-
Add Dependencies: Enable if this task depends on another task. Helps manage task order properly.
-
Initial Comment: Add notes or instructions at task start. Supports screenshots and file uploads.
-
Subtasks: Add smaller steps (one per line). Makes large tasks easier to complete.
-
Create Task Button: Click Create Task to save. The task is added to the project, and the assigned users are notified.
Create Project Tab
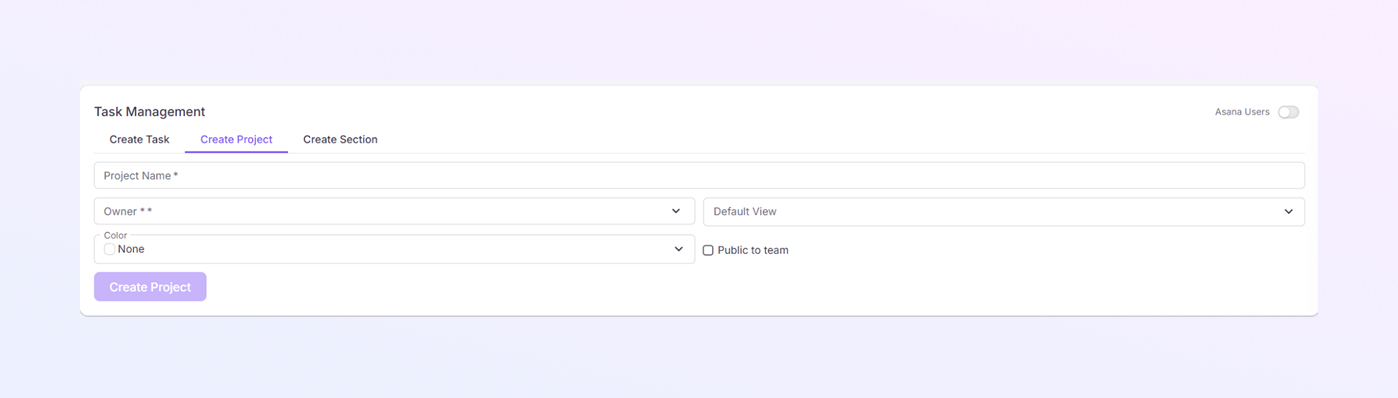
The Create Project tab is used to create a new project where tasks and sections will live.
-
Project Name *: Enter a clear and meaningful project name.
-
Owner *: Enter Owner name, Email address Or GID. The owner manages the project and oversees tasks.
-
Default View: Choose how tasks will be shown by default.
-
Color: Select a color for the project. Helps visually identify the project quickly.
-
Public to Team: Tick this checkbox to make the project visible to the team. Unticked projects remain restricted.
-
Create Project Button: Click Create Project to save. The project becomes available for task creation.
Create Section Tab
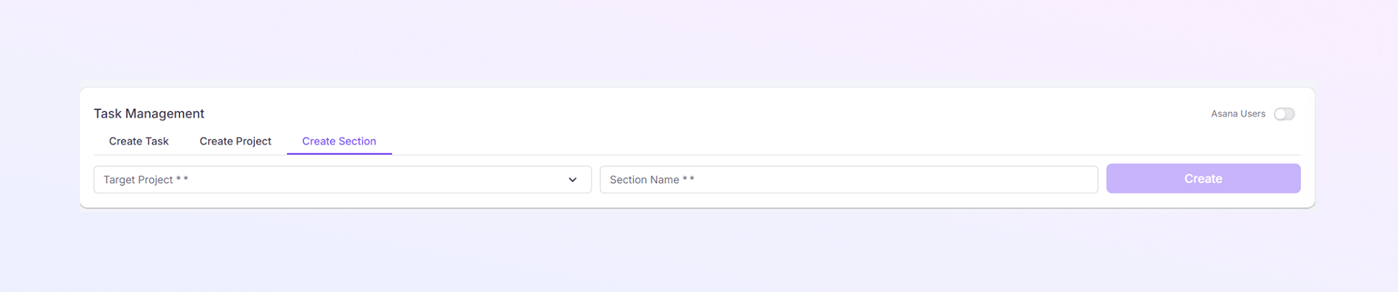
The Create Section tab is used to divide a project into smaller work areas.
-
Target Project *: Select the project where the section will be added. You can search by: Project name or Project GID.
-
Section Name *: Enter the section name. Sections help organize tasks clearly.
-
Create Button: Click Create to add the section. The section appears inside the selected project.
Summary
From the Task Management module, you can:
Create structured projects
Organize work using sections
Assign tasks with deadlines
Track time and progress
Keep communication and files in one place
This setup helps teams stay organized, focused, and productive inside Exact Flow.