

ExactFlow Invoices Page User Guide
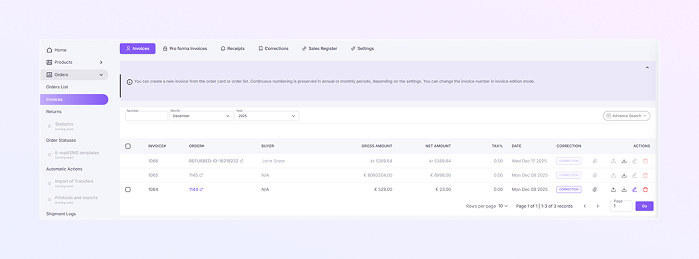
The Invoices page in ExactFlow allows you to view, manage, search, and control all invoices created from customer orders.
From this page, you can view all issued invoices in one place, Search and filter invoices easily, Open, download, print, or correct invoices.
How to Open the Invoices Page
Log in to your ExactFlow account.
From the left sidebar menu, click Orders.
Click Invoices.
The Invoices page will open.
Top Navigation Tabs
At the top of the page, you will see several tabs:
Invoices: View all issued invoices (current page)
Pro forma Invoices: View pro forma (preliminary) invoices
Receipts: View payment receipts
Corrections: View corrective invoices
Sales Register: View invoice data for accounting reports
Settings: Configure invoice-related settings
-
Invoices
Information Banner
At the top, you will see an information message explaining that:
-
You can create invoices from order cards or order lists.
-
Invoice numbering can be continuous (monthly or yearly).
-
Invoice numbers can be edited in invoice edit mode.
-
Number: Search by invoice number
-
Month: Select invoice month (example: December)
-
Year: Select invoice year (example: 2025)
-
Full Invoice Number: Search by complete invoice number
-
Surname: Customer last name
-
Company: Company name on the invoice
-
Tax ID: Company or customer tax number
-
Order ID: Invoice linked order number
-
Total Price From / To: Filter by invoice value range
-
Payment Method: Card, transfer, cash, etc.
-
Issue Date From / To – When the invoice was issued
-
Sale Date From / To – Date of the sale
-
Country: Customer country
-
Currency: Invoice currency
-
Cancelled: Show cancelled or active invoices only
-
Set Filters: Apply selected filters
-
Clear Filters: Remove all filters
-
Current Month: Quickly filter invoices for the current month
-
Selection Checkbox: Select one or more invoices to delete them.
-
Invoice #: Unique invoice number.
-
Order #: Linked order number.
-
Buyer: Customer or company name.
-
Gross Amount: Total invoice amount including tax.
-
Net Amount: Invoice amount excluding tax.
-
Tax%: Tax rate applied to the invoice.
-
Date: Invoice issue date.
-
Correction: Shows if the invoice has a corrective version.
-
Actions: Icons for invoice operations.
-
Selection Checkbox: Select one or more invoices to delete them.
-
View: Open invoice details
-
Download: Download invoice as PDF
-
Upload: Upload the invoice to the external system.
-
Edit: Edit invoice (if allowed)
-
Delete: Remove invoice (permission required)
-
If an invoice needs correction, click the Correction option.
-
Corrective invoices are linked to the original invoice.
-
This helps meet accounting and legal requirements.
-
Rows per Page: Choose how many invoices appear (default: 10)
-
Page Number: Shows current page and total records
-
Navigation Arrows: Move between pages
-
Go Button: Jump to a specific page
Basic Filters Section
These filters help you quickly find invoices.
Use these filters to narrow invoices by time period.
Advanced Search Panel
Click Advanced Search (top right) to open detailed filters.
Invoice Identification Filters
Filter Action Buttons
Invoices Table Overview
This is the main section where all invoices are displayed.
Invoice Action Icons
Each invoice row contains action icons:
Corrective Invoices
Pagination
Pagination controls help navigate large invoice lists.
-
-
Pro Forma Invoices:
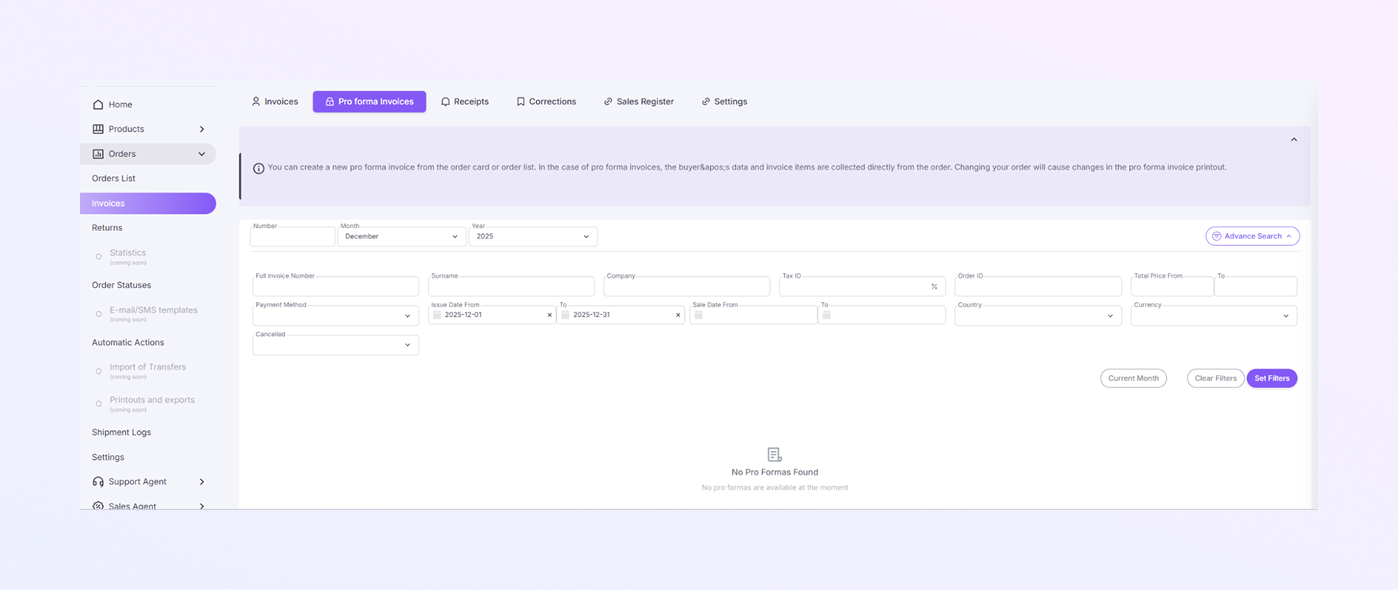
Information Banner
At the top, you will see an information message explaining that:
Pro forma invoices are created from orders
Buyer data and invoice items come directly from the order
If you change the order, the pro forma invoice will also change
Pro forma invoices are for preview and confirmation only
Basic Filters Section
These filters help you quickly find invoices.
Number: Search by pro forma invoice number
Month: Select invoice month (example: December)
Year: Select invoice year (example: 2025)
Use these filters to narrow invoices by time period.
Advanced Search Panel
Click Advanced Search (top right) to open detailed filters.
Full Invoice Number: Complete pro forma invoice number.
Order ID: Order linked to the pro forma invoice.
Company: Buyer company name
Surname: Buyer's last name
Tax ID: Company or buyer tax number.
Issue Date From / To: When the pro forma invoice was created.
Sale Date From / To: Sale date from the linked order.
Payment Method: Card, bank transfer, cash, etc.
Currency: Invoice currency
Total Price From / To: Filter by invoice value range.
Country: Buyer country
Cancelled: Show cancelled or active pro forma invoices.
Filter Action Buttons
Set Filters: Apply selected filters
Clear Filters: Remove all filters
Current Month: Show only current month pro forma invoices
Pro Forma Invoices List Overview
When pro forma invoices exist, the table will show:
Invoice Number: Unique pro forma number
Order Number: Linked order reference
Buyer: Customer or company name
Gross Amount: Total amount including tax
Net Amount: Amount without tax
Tax %: Applied tax rate
Date: Issue date
Actions: Available invoice actions
Pro Forma Invoice Action Icons
Each invoice row contains action icons:
View: Open pro forma invoice details
Download: Download invoice as PDF
Upload: Upload the invoice to the external system.
Edit: Editing is usually limited because pro forma invoices depend on order data.
Delete: Remove invoice (permission required)
Pagination
If many pro forma invoices exist, pagination will appear:
Rows per Page: Choose number of records shown (default: 10)
Page Indicator: Shows current page and total records
Navigation Arrows: Move between pages
Go Button: Jump to a specific page
-
Receipts:
Basic Filters Section
These filters help you quickly find invoices.
Number: Search by invoice number
Month: Select invoice month (example: December)
Year: Select invoice year (example: 2025)
Use these filters to narrow invoices by time period.
Advanced Search Panel
Click Advanced Search (top right) to open detailed filters.
Document Number: Search by document number
Order ID: Invoice linked order number
Cancelled: Show cancelled or active invoices only
Issue Date From / To: When the invoice was issued
Print Date From / To: Date of the sale
Payment Method: Card, transfer, cash, etc.
Currency: Invoice currency
Total Price From / To: Filter by invoice value range
Filter Action Buttons
Set Filters: Apply selected filters
Clear Filters: Remove all filters
Current Month: Quickly filter invoices for the current month
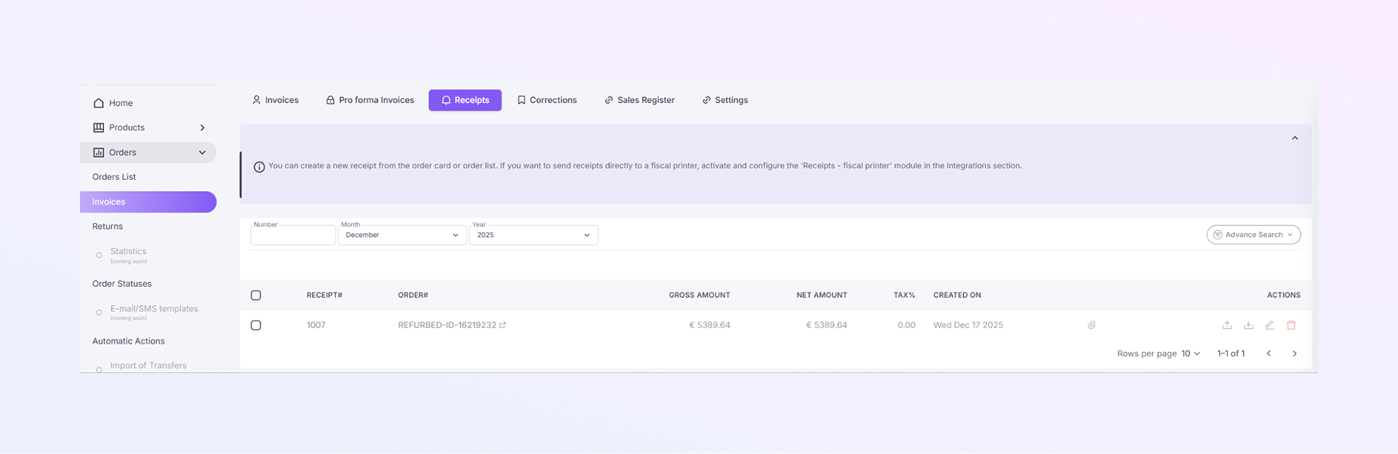
Receipts Table Overview
This is the main section where all Receipts are displayed.
Selection Checkbox: Select one or more receipts to delete them.
Receipt #: Unique receipt number.
Order #: Linked order number.
Gross Amount: Total Receipt amount including tax.
Net Amount: Receipt amount excluding tax.
Tax%: Tax rate applied to the Receipt.
Created on: Receipt issue date.
Actions: Icons for Receipt operations.
Receipt Action Icons
Each receipt row contains action icons:
View: Open Receipt details
Download: Download invoice as PDF
Upload: upload the Receipt to the external system
Edit: Edit Receipt (if allowed)
Delete: Remove Receipt (permission required)
Pagination
Pagination controls help navigate large invoice lists.
Rows per Page: Choose how many invoices appear (default: 10)
Page Number: Shows current page and total records
Navigation Arrows: Move between pages
Go Button: Jump to a specific page
-
Corrections:
Information Banner
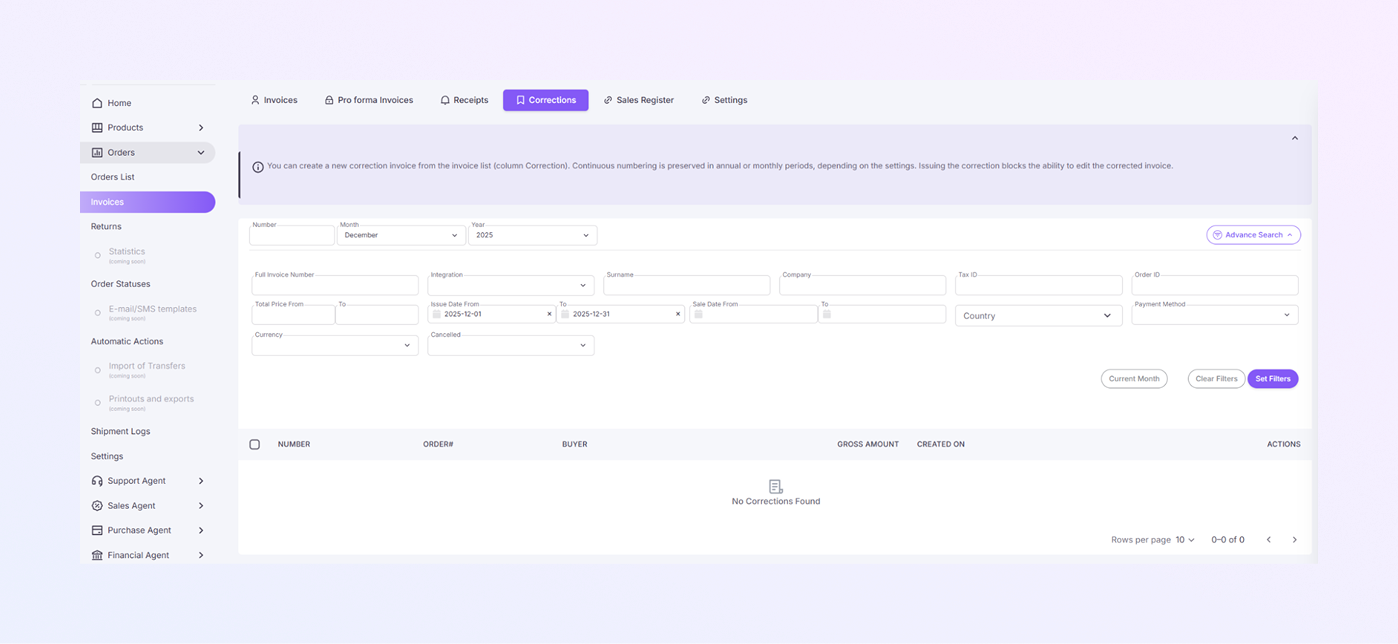
At the top of the page, you will see an information message explaining that:
Correction invoices are created from the Invoices list.
Numbering is continuous (monthly or yearly, based on settings).
Once a correction is issued, the original invoice cannot be edited.
Basic Filters Section
These filters help you quickly find correction invoices.
Number: Search by correction invoice number
Month: Select correction month (example: December)
Year: Select correction year (example: 2025)
Advanced Search Panel
Click Advanced Search (top right) to open detailed filter options.
Full Invoice Number: Original or corrective invoice number
Order ID: Order linked to the corrected invoice
Integration: Sales channel or integration source
Company: Buyer company name
Surname: Buyer's last name
Tax ID: Buyer or company tax number
Total Price From / To: Filter corrections by amount range
Issue Date From / To: When the correction invoice was created.
Sale Date From / To: Sale date of the original invoice.
Country: Buyer country
Payment Method: Card, transfer, cash, etc.
Currency: Invoice currency
Cancelled: Show cancelled or active corrections only.
Filter Action Buttons
Set Filters: Apply selected filters
Clear Filters: Remove all filters
Current Month: Show corrections for the current month.
Corrections Table Overview
This section displays all corrective invoices.
Selection Checkbox: Select one or more correction records to delete them.
Number: Correction invoice number.
Order #: Linked order reference.
Buyer: Customer or company name.
Gross Amount: Total corrected amount (including tax).
Created On: Date when the correction invoice was issued.
Actions: Available actions for the correction.
Pro Forma Invoice Action Icons
When corrections exist, action icons may include:
View: Open correction invoice details
Download: Download correction as a PDF
Print: Print the correction invoice
Correction invoices are usually read-only and cannot be edited.
Order Dates
Order Date: Date when the order was created.
Order Status Date: Date of the latest status update.
Pagination
If there are many correction records:
Rows per Page: Choose how many records appear (default: 10)
Page Indicator: Shows current page and total records.
Navigation Arrows: Move between pages.
-
Sales Register:
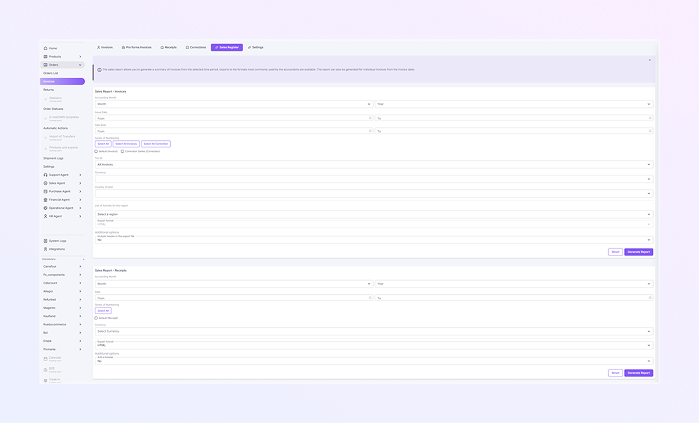
Information Banner
At the top, you'll see an explanation saying that:
The report allows you to generate a summary of invoices and receipts.
It also mentions the ability to export this information in formats commonly used by accountants.
Sales Report – Invoices
Accounting Month:
-
Select the Month: Choose the month for which you want the invoice data.
-
Year: Select the year to view the invoices for a specific time period.
-
Issue Date: You can choose a From and To date to specify the range of the invoices you want to include.
Series of Numbering: You can select the numbering series for the invoices. Options are:
-
Select All
-
All Invoices
-
All Corrective Invoices
-
Tax ID: Choose which tax ID you want the report to include. Options are available based on your settings.
-
Currency: Select the currency you want the report to display.
-
Country (Code): Choose the country or country code for the invoice data.
-
Formats for Region: Choose the region for the export format.
-
Export Format: Choose the format in which the report will be generated (e.g., HTML or PDF).
Additional Options:
-
Include Header in Export File: Toggle this option to decide whether to include a header in the exported file.
-
Sales Report – Receipts
Accounting Month: Same as the Invoices section, choose the month and year for which you want the receipt data.
Date: Select a From and To date range for the receipts report.
Series of Numbering: Choose the series number for the receipts, similar to the Invoices section.
Currency: Select the currency for the receipts.
Export Format: Select the Export Format, e.g., HTML, to determine the file format for the receipt data.
Additional Options:
-
Add a Header: Toggle this option to decide whether to include a header in the exported file.
-
Generating the Report
Once you've selected your desired filters, you can either:
Click Generate Report to create the report based on your settings.
Click Reset to clear all your selected filters and start again.
-
Settings
Information Banner
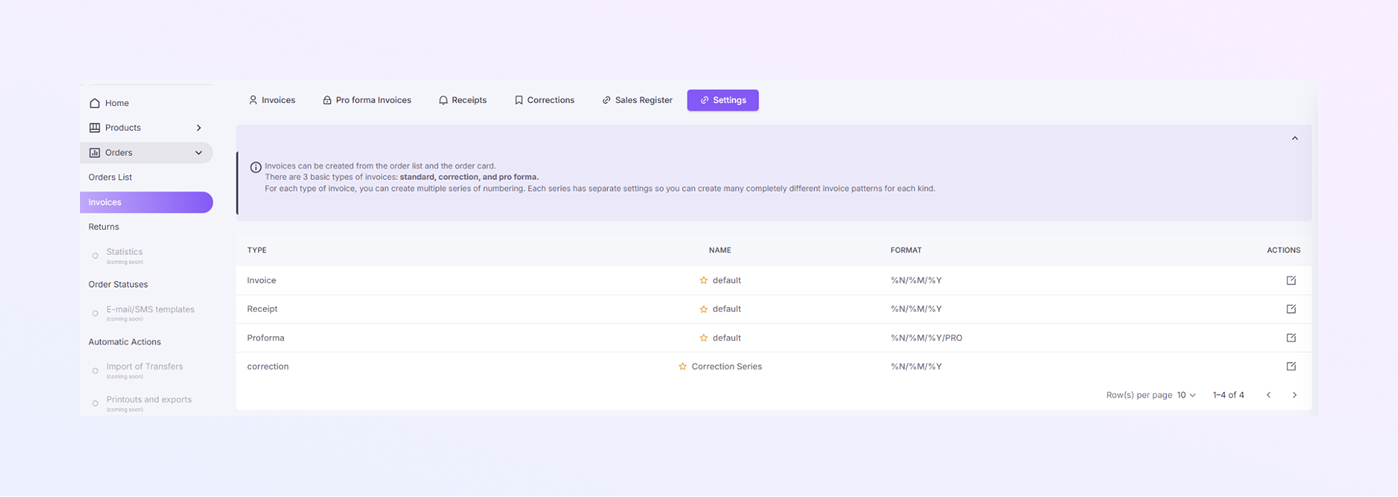
At the top of the page, you will see a brief description explaining that invoices can be created directly from the order list or the order card. The page also highlights the three basic types of invoices:
Standard Invoices
Proforma Invoices
Corrective Invoices
Each of these invoice types allows you to create multiple series of numbering. This lets you customise the way invoices are numbered and formatted for different needs.
Invoices Types
Under the TYPE column, you will see the following types of invoices:
Invoice: This is the standard invoice type used for typical transactions.
Receipt: This type is used when issuing a receipt for a payment.
Proforma: Proforma invoices are typically used to provide an estimate before an actual sale is completed.
Correction: This type is used to create corrective invoices, such as when you need to adjust an invoice.
Invoice Settings for Each Type
For each invoice type, the settings are as follows:
Name: The default name is listed for each invoice type (e.g., "default"). You can edit the name if needed.
Format: The format is shown as a series of placeholders. This defines how your invoices will be numbered, such as %N/%M/%Y (which stands for invoice number/month/year).
Actions for Each Invoice Type
When you click the edit icon next to an invoice type in the Invoices Settings page, a window will open, allowing you to configure the numbering format and other details related to the invoice. Here’s a breakdown of each setting you can modify:
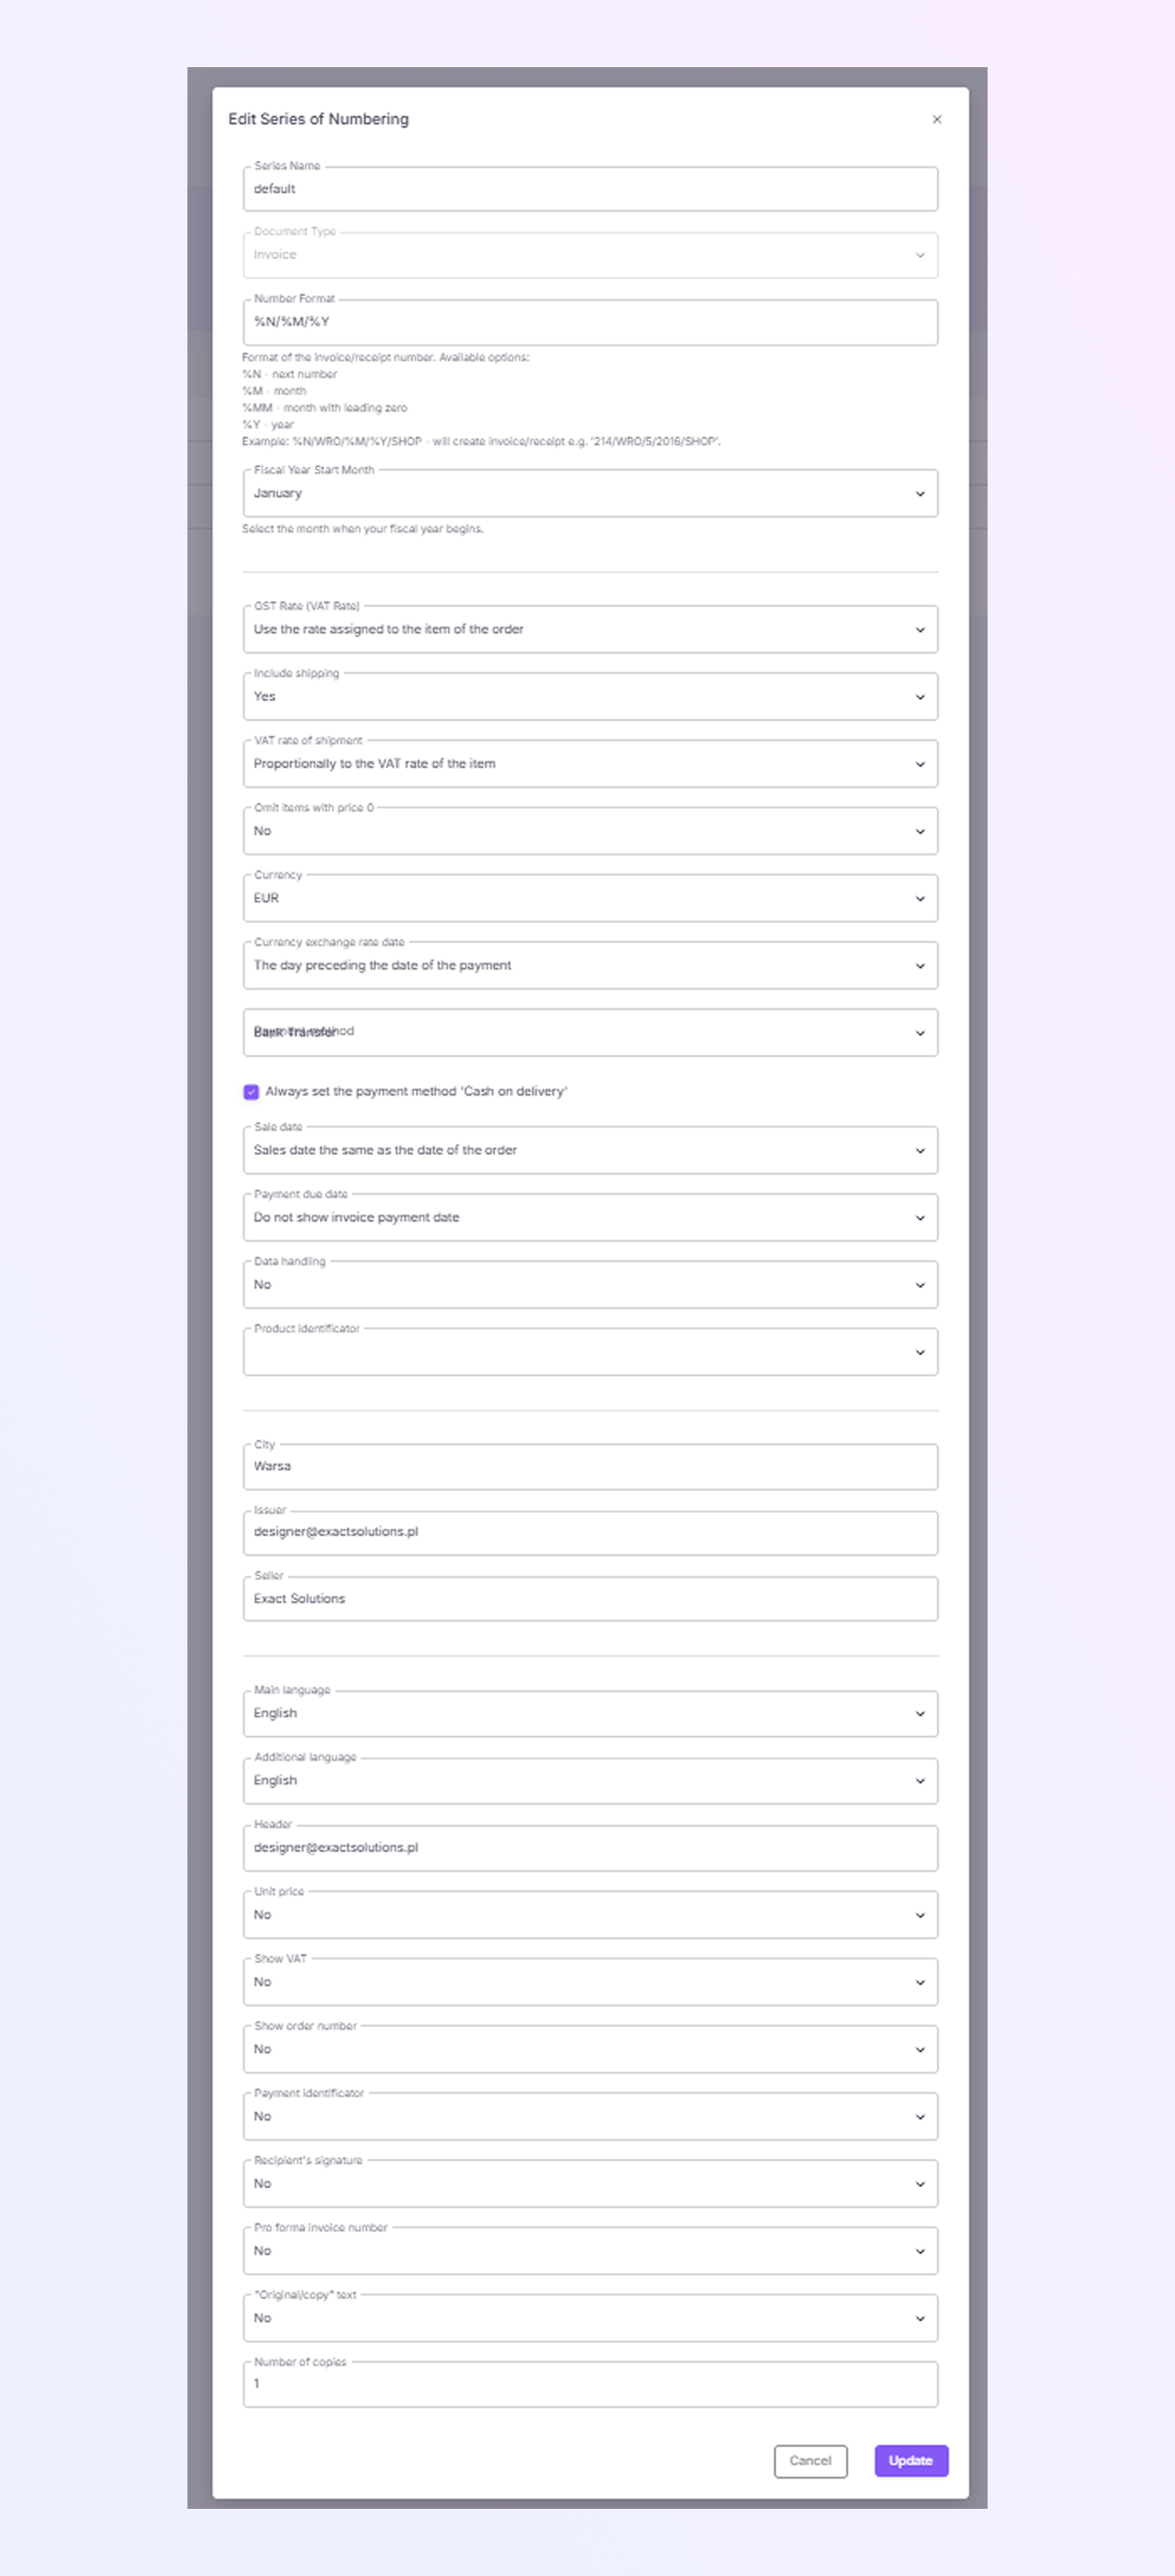
Series Name: Enter a name for this series of numbering. This could be something like default, invoice series 1, etc. This helps you identify different numbering sequences.
Document Type: Select the type of document you are setting the numbering for. Options include:
-
Invoice
-
Receipt
-
Proforma Invoice
-
Number Format: Choose how you want your invoice number to be formatted. Common options include:
-
%N: Next number (sequential)
-
%M: Month
-
%Y: Year
-
Example format: %N/%M/%Y (This will create invoice numbers like 1/12/2025, where 1 is the invoice number, 12 is the month, and 2025 is the year).
-
-
Fiscal Year Start Month: Choose which month your fiscal year starts from. This is important for your financial year calculations.
-
GST (VAT) Rate: Select how the VAT rate will be applied:
-
Use the rate assigned to the item of the order: This will use the VAT rate assigned to each product in the order.
-
-
Include Shipping: Decide if the shipping cost should be included in the VAT calculation: Yes/No: Toggle this option based on your needs.
-
VAT Rate of Shipment: Select whether the VAT rate for the shipment should be proportional to the VAT rate of the item in the order.
-
Omit Items with Price 0: This option allows you to decide whether to exclude items with a price of 0 from the invoice: Yes/No
-
Currency: Choose the currency in which the invoice will be issued (e.g., EUR, USD, etc.).
-
Currency Exchange Rate Data: Select whether the exchange rate will be taken from the day preceding the payment date. This is useful for businesses dealing with international clients.
-
Payment Method: Select the default payment method to be used for this invoice type. For example: Bank Transfer or Cash on Delivery (if set to always be used).
-
Always Set Payment Method 'Cash on Delivery': Toggle this setting if you want the Cash on Delivery option to always be pre-selected as the payment method for this invoice.
-
Sale Date: Choose whether the sale date will be the same as the order date or another selected date.
-
Payment Due Date: Decide whether to show the payment due date on the invoice: Yes/No
-
Data Handling: You can choose if you want to show data related to the payment or not by selecting Yes/No.
-
Product Identifier: Here, you can add a unique product identifier for your items (e.g., SKU, Product Code).
-
City: Enter the city name that should appear on the invoice (e.g., Warsaw).
-
Issuer: The issuer's name or email is displayed on the invoice (e.g., designer@exactsolutions.pl).
-
Seller: Enter the seller's name or company name that is issuing the invoice (e.g., Exact Solutions).
-
Main Language: Select the main language for the invoice (e.g., English).
-
Additional Language: If needed, choose an additional language for the invoice (e.g., Spanish, German).
-
Header: You can add a custom header text (e.g., designer@exactsolutions.pl) that will appear on your invoices.
-
Unit Price: Choose whether the unit price should be shown on the invoice: Yes/No
-
Show VAT: Decide whether the VAT amount should be shown on the invoice: Yes/No
-
Show Order Number: Choose whether to display the order number on the invoice: Yes/No
-
Payment Identifier: Choose whether to display a payment identifier: Yes/No
-
Recipient's Signature: Decide if a signature field should be included on the invoice for the recipient: Yes/No
-
Pro Forma Invoice Number: If it’s a pro forma invoice, you can choose whether to display a pro forma invoice number: Yes/No
-
"Original/Copy" Text: You can choose whether to add the text "Original" or "Copy" on the invoice: Yes/No
-
Number of Copies: Specify how many copies of the invoice should be printed or generated: Number (e.g., 1).
-
Once you’ve made all the necessary changes, click the Update button to save your changes. If you don’t want to save the changes, click Cancel.
-
Starred Invoices: Some invoice types can be starred for easier access. You will see a star icon next to certain invoice types. By clicking the star, you can mark it as default or highlight it for quick reference.
-
Rows per Page: You can adjust how many invoice types appear per page. By default, it shows 10, but you can increase or decrease this number.
-
Page Navigation: Use the arrows at the bottom of the page to move between pages and view more invoice types if necessary.
Updating the Settings
Managing Invoice Types
Pagination