

ExactFlow Automatic Action Page User Guide
Automatic actions are rules that run by themselves when something happens (an event). Three elements make up a rule:
-
Event, the start of the rule (e.g., Product Created).
-
Conditions are filters that determine when a rule is applicable (e.g., product category = "clothing")
-
Actions are what the system does when certain conditions are met, such as sending an email, changing a price, or setting a star.
You don't have to stay on the page because the system executes the many actions you add in the background.
Open the Automatic Actions page
-
Select Products → Automatic Actions from the left menu.
-
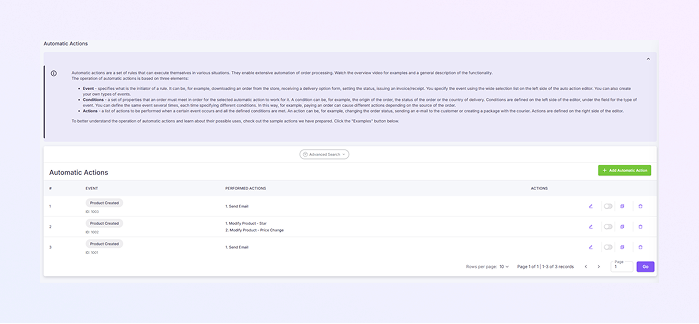
The page shows:
-
At the top is a brief purple explanation panel that explains what automatic actions are.
-
The current automatic actions are listed in the table below.
-
In the top right corner is a green “Add Automatic Action" button.
-
Read the automatic actions list.
-
Row number
-
Event: which event triggers the rule (example: Product Created)
-
Performed Actions: a short list of actions the rule will do (example: Send Email)
-
Action icons: on the right for quick operations:
-
Edit: open the rule to modify it
-
Toggle On / Off: enable or disable the rule
-
Copy / Duplicate: make a copy of the rule
-
Delete: remove the rule.
-
The main table shows each rule in rows. For each rule, you can see:
Step 1: Create a new Automatic Action.
-
Click the green Add Automatic Action button.
-
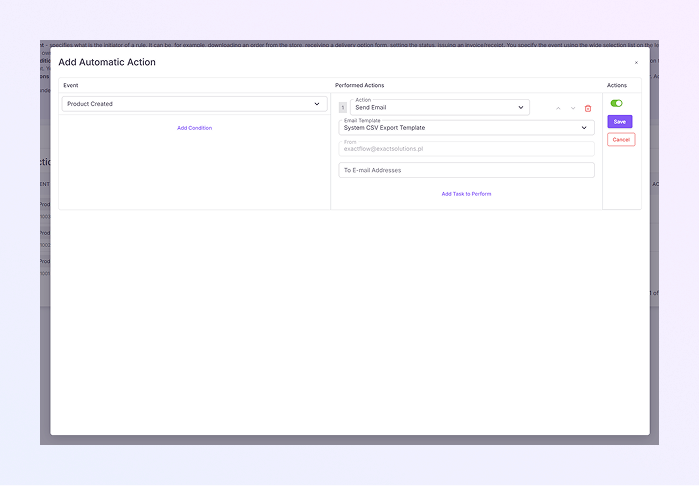
A modal window opens with two main areas:
-
Event and Conditions area. The event and conditions section is on the left.
-
The Performed Actions area (what will happen) is on the right.
-
-
Select the event that will start this rule from the Event dropdown menu on the left.
-
Example: Product Created.
-
-
To restrict when the rule runs, click Add Condition on the left.
-
Add condition fields such as category, source, SKU, country, price range, etc.
-
You can add many conditions; all must be met for the action to run.
-
-
Select an action from the dropdown menu on the Performed Actions side on the right:
-
Examples of actions include sending emails, setting stars, adding or removing tags, changing stock levels, changing prices, creating SKUs, and more.
-
-
Fill required fields for that action:
-
If Send Email, then choose Email Template, enter recipient emails, etc.
-
If Change price then enter the new price or formula.
-
-
To add more actions (run multiple things in order): click Add Task to Perform or use up/down arrows to set order.
-
The order in which actions are performed is shown.
-
-
To enable the rule now, use the toggle on the right (green = enabled).
-
To save the rule, click Save (purple). To discard, click Cancel.
Note: You don't need to keep the page open because operations are queued and executed in the background once they are saved.
Step 2: Edit an existing rule
-
Click the Edit icon for that rule on the list.
-
The same modal opens with the event, conditions, and actions prefilled.
-
Click Save after making changes to any field or action and adding or removing tasks.
Step 3: Enable or Disable a Rule
-
On the right side of the row, click the small toggle:
-
ON (green) indicates that the rule runs automatically.
-
OFF (gray) indicates that the rule is paused and won't run.
-
-
When you want to stop a rule temporarily, use disable.
Step 4: Copy (duplicate) a rule
-
On the rule row, click the copy / duplicate icon (clipboard).
-
The system will create a duplicate rule (you can then edit and save it under a new ID).
When you want a similar rule with minor modifications, this is helpful.
Step 5: Delete a rule
-
Click the trash icon on the rule row.
-
Confirm the deletion in the pop-up window.
Note: The rule is permanently removed when it is deleted.
Advanced search & navigation
-
Click Advanced Search above the table to filter rules in the list by entering events, conditions, and action ID.
-
To navigate between pages, use the pagination controls at the bottom right.