

ExactFlow Import/Export Page User Guide
The Product Module in ExactFlow helps you upload products, update product data, and export product files anytime you need.
Each section of this guide is thoroughly explained.
Accessing the Product Module
-
Log in to your ExactFlow account.
-
Click Products from the left menu.
-
Click Import/Export. Two tabs will now be visible to you:
-
Import: upload products into ExactFlow.
-
Export: download products from ExactFlow.
-
Import Products
-
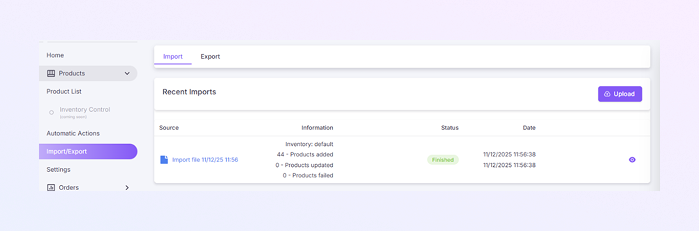
Recent Imports
Here you can see:
-
The file that you uploaded.
-
In the information column, you see how many products were added, updated, or failed
-
The import status (e.g., Finished)
-
The date and time of each import
-
A small eye icon to view the details
This helps you keep track of your previous uploads.
-
-
Start a New Import
Follow these steps to upload a new product file.
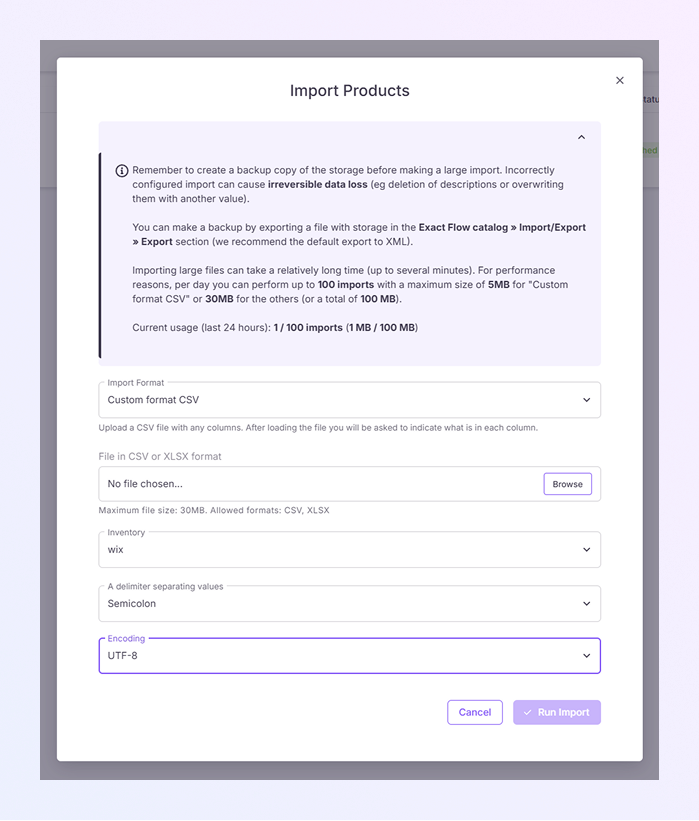
Step 1: Click the “Upload” Button.
A pop-up window “ Import Products” will open.
Step 2: Read the Import Notes
At the top, you will see helpful information:
-
Before making significant changes, always create a backup.
-
Data loss from incorrect imports may be irreversible.
-
Currently, there are no restrictions on the number of uploads or file size in ExactFlow. You can upload as many files as needed.
Step 3: Choose the Import Format
Select from the dropdown menu. A Custom format CSV is recommended for flexible mapping, and also choose other system formats (if available).
Step 4: Upload Your File
Click Browse. Choose your CSV or XLSX file only.
Step 5: Select Inventory
Choose which “Inventory” your products will be saved in. Example: “wix” or any other warehouse/inventory name.
Step 6: Select Value Separator.
This is the symbol your file uses between columns. Common options: Comma (,), Semicolon (;), Tab. Select the correct option so that your file is formatted properly.
Step 7: Choose Encoding.
Usually, UTF-8 (default) is correct.
Step 8: Click “Run Import”.
ExactFlow will process your file.
After the import, newly added products are listed, and any errors (if present) are displayed in the Recent Imports table.
-
There are two primary sections on the Import tab:
Export Products
Click the Export tab to download product information. This page has three main sections:
-
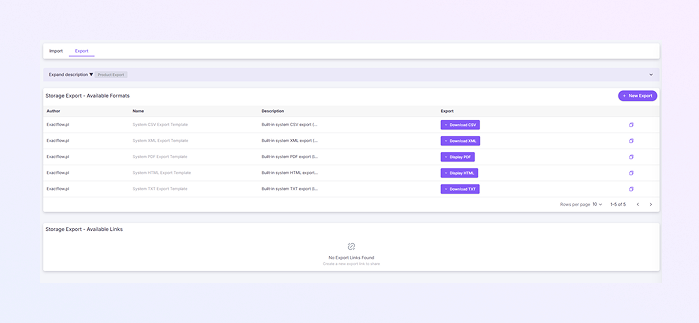
Storage Export – Available Formats
These are built-in system templates you can use to download product data.
Each row shows:
-
Author: usually “Exactflow.pl”.
-
Name: type of template (CSV/XML/PDF/HTML/TXT)
-
Description: explains what the file contains.
-
Export Button: lets you download or display the file. Examples: Download CSV, Download XML, Display PDF, Download TXT, Display HTML.
Description: explains what the file contains.
You simply click the button, and your product file is generated.
-
-
Storage Export – Available Links
This area will show export links you have created. You can create a new one using the New Export button.
-
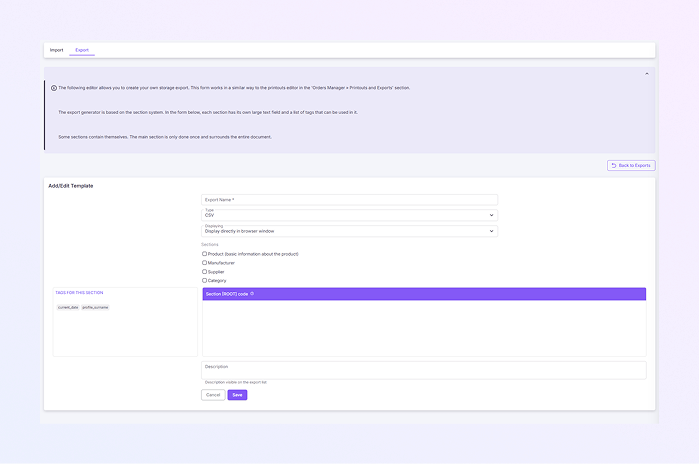
Add New Export
When you click New Export, you will see a form called Add/Edit Template. Here’s how to use it:
Step 1: Enter Export Name.
Step 2: Select Export Type.
Choose a file format: CSV, XML, HTML, TXT, or PDF.
Step 3: Choose How to Display.
Options include: Display in browser, and download the file to the disk. Choose the one you prefer.
Step 4: Select Sections to Include.
Tick the information you want, e.g., Product (main details), Manufacturer, Supplier, Category. You can select one or multiple. To ensure correct export of data, make sure your template uses proper HTML tags so the system can read and format the information accurately.
Step 5: Edit the Template Section
You will see a large purple box labeled “Section [ROOT] code”. This box contains tags you can use, such as: current_date, profile_surname. This area controls the layout of your exported file. (You can leave it as the default if you are unsure.)
Step 6: Add Description (Optional)
This will show under your template name later.
Step 7: Save Template
Click Save.
Your new export format will now appear in the Export list and can be downloaded anytime.