

ExactFlow Inventories Page User Guide
This guide explains the Inventories page in the ExactFlow Product module.
-
Open the ExactFlow app
-
From the left menu, click Products.
-
Click Settings.
-
Select Inventories
-
Inventories List Page
-
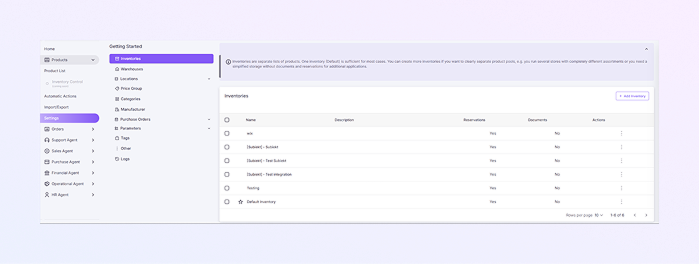
At the top, you see an info message explaining what inventories are, and when you should create more than one inventory. This is only for guidance and does not change any settings.
-
The Inventories Table shows all existing inventories.
-
Checkbox: Select one or more inventories.
-
Name: Inventory name
-
Description: Short explanation (if added)
-
Reservations: Shows whether stock reservation is enabled (Yes / No)
-
Documents: Shows whether storage documents are enabled (Yes / No)
-
Actions: Three-dot menu for inventory actions
-
-
The inventory marked with a ⭐ is the Default Inventory.
-
It is used automatically when no other inventory is selected.
-
You cannot delete the default inventory.
-
-
Add a New Inventory
-
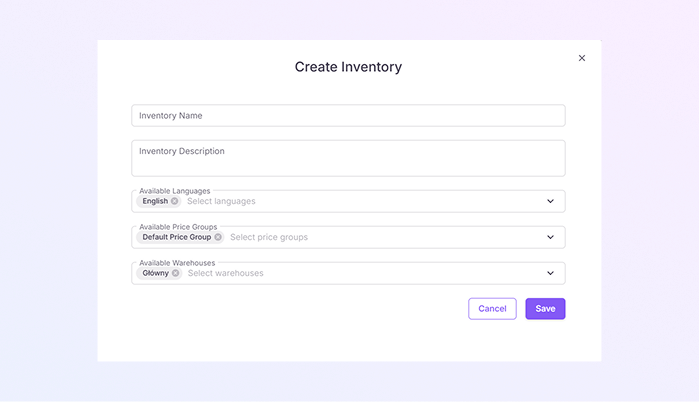
On the Inventories page, click + Add Inventory (top-right), then the Create Inventory pop-up opens.
-
Enter a clear and unique Inventory name. Example: Online Store Inventory.
-
Add a short note about the Inventory Description. It is an optional field.
-
Select the languages used for products in this inventory. You can select multiple languages if needed.
-
Select which price groups are available in this inventory. You can also select multiple price groups if needed.
-
Select one or more warehouses. Stock for this inventory will come from these warehouses.
-
Click Save to create the inventory, or click Cancel to close without saving. Once saved, the inventory appears in the Inventories list.
-
From the Actions three-dot menu, you can Edit inventory settings, Manage configuration (based on permissions), and View inventory details.
-
How to Open the Inventories Page
You will now see the Inventories list page.