

ExactFlow Location Page User Guide
This guide explains the Locations page in the ExactFlow Product module. This page has a further four subpages: Zones, Racks, Location types, and Location list.
-
What is a Zone?
A Zone is a logical area inside a warehouse. It helps you organize locations better, for example: Picking zone, Storage zone, Packing zone, and Returns zone.
Zones make warehouse operations faster and more organized.
How to Open the Zones Page
-
Log in to ExactFlow.
-
From the left menu, click Products.
-
Click Settings → Open Locations → Click Zones.
You will now see the Zones page.
Zones Page Overview
-
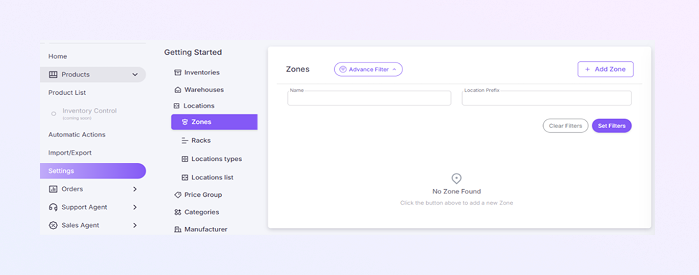
On the Zones page, you can view all existing zones, search or filter zones, and add a new zone.
-
Click “Advanced Filter” to open filtering options. You will see two input fields for the filter section:
-
Name: Search zones by zone name.
-
Location Prefix: Search by prefix code.
-
-
You can apply the filters by clicking the “Set filters” button, and remove all filters by clicking the “Clear filters” button.
Add Zone
-
A purple “+ Add Zone” button on the top right. Click this to create a new zone.
-
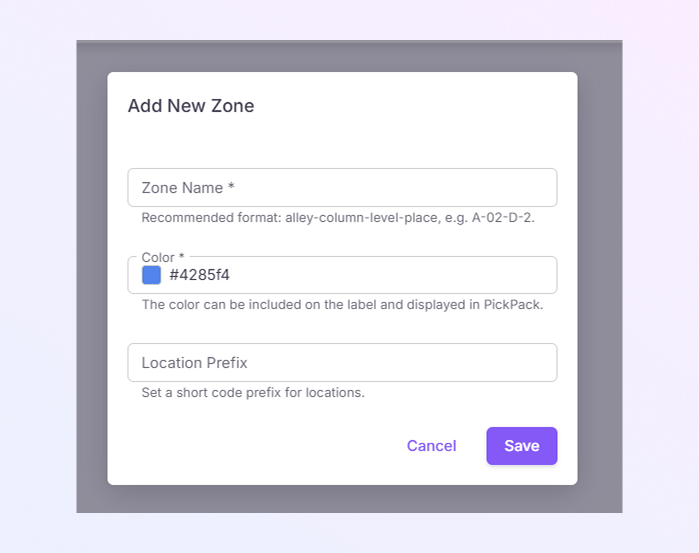
After clicking, a pop-up titled “Add New Zone” will appear.
-
Enter a unique Zone Name. It is a required field. Recommended format: alley-column-level-place Example: A-02-D-2
-
Choose a Color or use the default color code (example: #4285f4). It is also a required field. The purpose of color is to be used on labels and displayed in PickPack. It helps visually identify zones quickly.
-
Enter Location Prefix (Optional), a short code for locations in this zone. Example: A02. This prefix is automatically added to locations created under this zone.
-
Click Save, then the zone is created and added to the list. Or click Cancel, then the pop-up closes without saving.
-
Once saved, the zone appears in the Zones list. You can use it when creating racks, creating locations, and managing warehouse picking and storage.
-
-
What is a Rack?
A Rack represents a physical shelving unit inside a warehouse zone. Racks help you organize products clearly so warehouse staff can find, pick, and store items faster.
Each rack belongs to a Zone, has one or two sides (for example: Front and Back), and uses location prefixes to generate storage locations.
How to Open the Racks Page
-
Log in to ExactFlow.
-
From the left menu, click Products.
-
Click Settings → Open Locations → Click Racks.
You will now see the Racks page.
Racks Page Overview
-
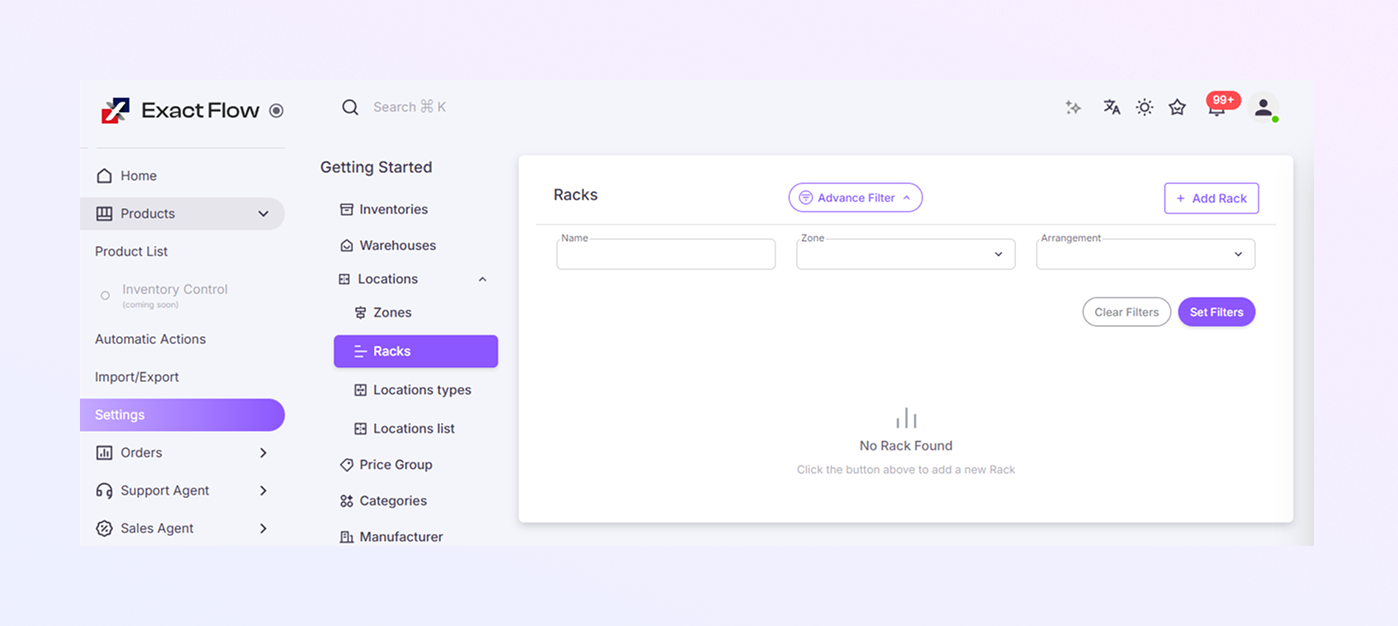
On the Racks page, you can view all existing racks, search or filter racks, and add a new rack.
-
Click "Advanced Filter" to open the filtering options. You will see three input fields for the filter section:
-
Name field: Search racks by their name.
-
Zone dropdown: Filter racks by a specific zone.
-
Arrangement dropdown: Filter racks based on their physical orientation.
-
-
You can apply the filters by clicking the “Set filters” button, and remove all filters by clicking the “Clear filters” button.
Add Rack
-
A purple “+ Add Rack” button on the top right. Click this to create a new rack.
-
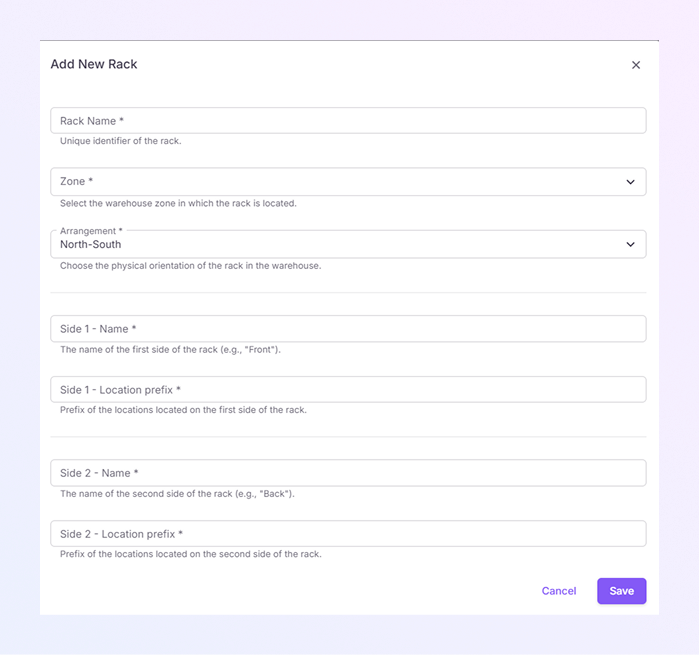
After clicking, a pop-up titled “Add New Rack” will appear.
-
Enter a unique Rack Name *. Example: Rack-A01. This helps identify the rack easily.
-
Select the Zone * where this rack is located. Zones must already exist before creating racks. Example: Zone A, Cold Storage, etc.
-
Choose Arrangement * how the rack is physically positioned. Example: North–South. This helps optimize picking routes inside the warehouse.
-
Enter Side 1 – Name * the first side of the rack. Example: Front
-
Enter a short Side 1 – Location Prefix *. Example: F. This prefix will be used when generating storage locations.
-
Enter the Side 2 – Name * the second side of the rack. Example: Back
-
Enter a short Side 2 – Location Prefix *. Example: B
-
Click Save, then the rack is created and added to the list. Or click Cancel, then the pop-up closes without saving.
-
Once saved, the rack appears in the Racks list. You can use it when creating racks, creating locations, and managing warehouse picking and storage.
-
The rack will appear in the Racks list. It can now be used to create detailed storage locations, organize inventory, and improve picking accuracy.
-
-
What are Location Types?
Location Types help you define the types of storage spaces you have in your warehouse, such as Small Box, Medium Box, Pallet, Shelf, and High Storage.
Each location type can have limits like quantity, weight, and size. This helps ExactFlow:
-
Prevent overloading locations
-
Improve stock organization
-
Make picking and storage more accurate
How to Open the Location Types Page
-
Log in to ExactFlow.
-
From the left menu, click Products.
-
Click Settings → Open Locations → Click Location types.
You will now see the Location types page.
Location Types Page Overview
-
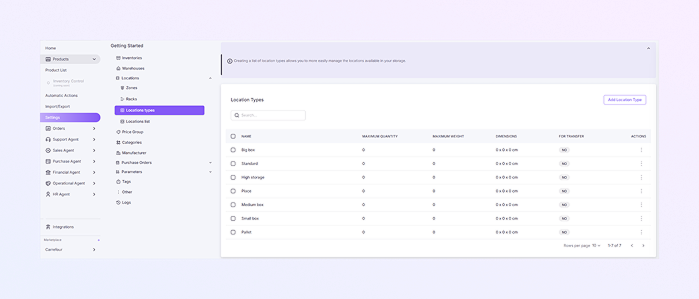
The Search Bar is located at the top of the page. Use it to search by location type name. Example: type box to find all box-related types.
-
In the Location Types Table, each row represents one location type.
-
Checkbox: Select one or multiple location types. Useful for bulk actions (if enabled).
-
Name: The name of the location type. Examples: Big box, Pallet, and Small box.
-
Maximum Quantity: Shows the maximum number of items allowed. 0 means no limit.
-
Maximum Weight: Shows the maximum allowed weight. 0 means no weight limit
-
Dimensions: Displays Width × Height × Depth (in cm). 0 × 0 × 0 cm means no size limit.
-
For Transfer: Indicates whether this location type can be used for stock transfers. Values:
-
YES: allowed for transfers
-
NO: not allowed
-
-
Actions (⋮): Click the three dots to edit the location type, and delete the location type (if allowed).
-
Add Location Type
-
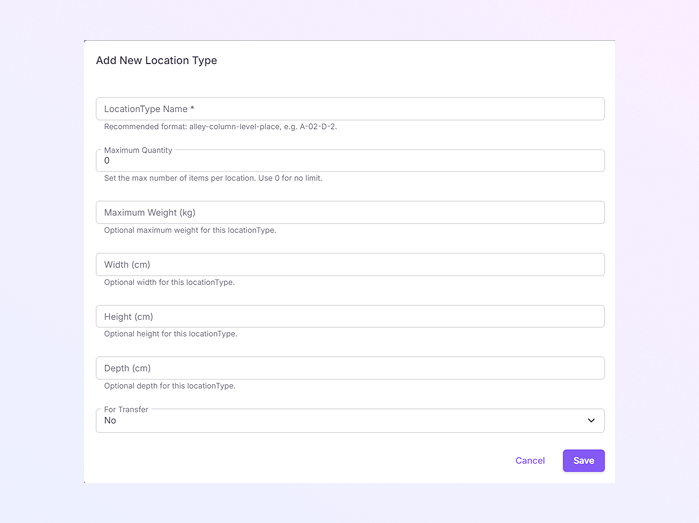
Click the Add Location Type button located at the top-right corner. The Add New Location Type form opens.
-
Enter a clear and simple Location Type Name *. Example: Small Box, Pallet.
-
In Maximum Quantity, set the maximum number of items allowed in this location. Enter 0 if there is no limit.
-
In Maximum Weight (kg), set the maximum weight this location can handle. Leave empty if weight does not matter. Example: 500 → maximum 500 kg allowed.
-
In Width (cm), set the maximum width of items allowed.
-
In Height (cm), set the maximum height of items allowed.
-
In Depth (cm): Set the maximum depth of items allowed.
-
In For Transfer, choose whether this location type can be used during stock transfers. Options:
-
Yes: can be used when transferring stock.
-
No: cannot be used for transfers.
-
-
Click Save to create the location type or Click Cancel to discard changes.
-
-
What is the Locations List?
The Locations List shows all physical places where products are stored inside your warehouse. Examples of locations: shelf, bin, box, pallet space
Each location helps you know where products are stored and helps warehouse staff during picking and packing.
How to Open the Racks Page
-
Log in to ExactFlow.
-
From the left menu, click Products.
-
Click Settings → Open Locations → Click Locations list.
You will now see the Locations List page.
Locations List Page Overview
-
At the top of the page, you can filter locations by: Name, Type, Zone, Rack, and Available for picking.
-
Click the Advanced Filter, enter or select filter values, then click Set Filters. The list updates automatically.
-
Click Clear Filters to reset all filters.
-
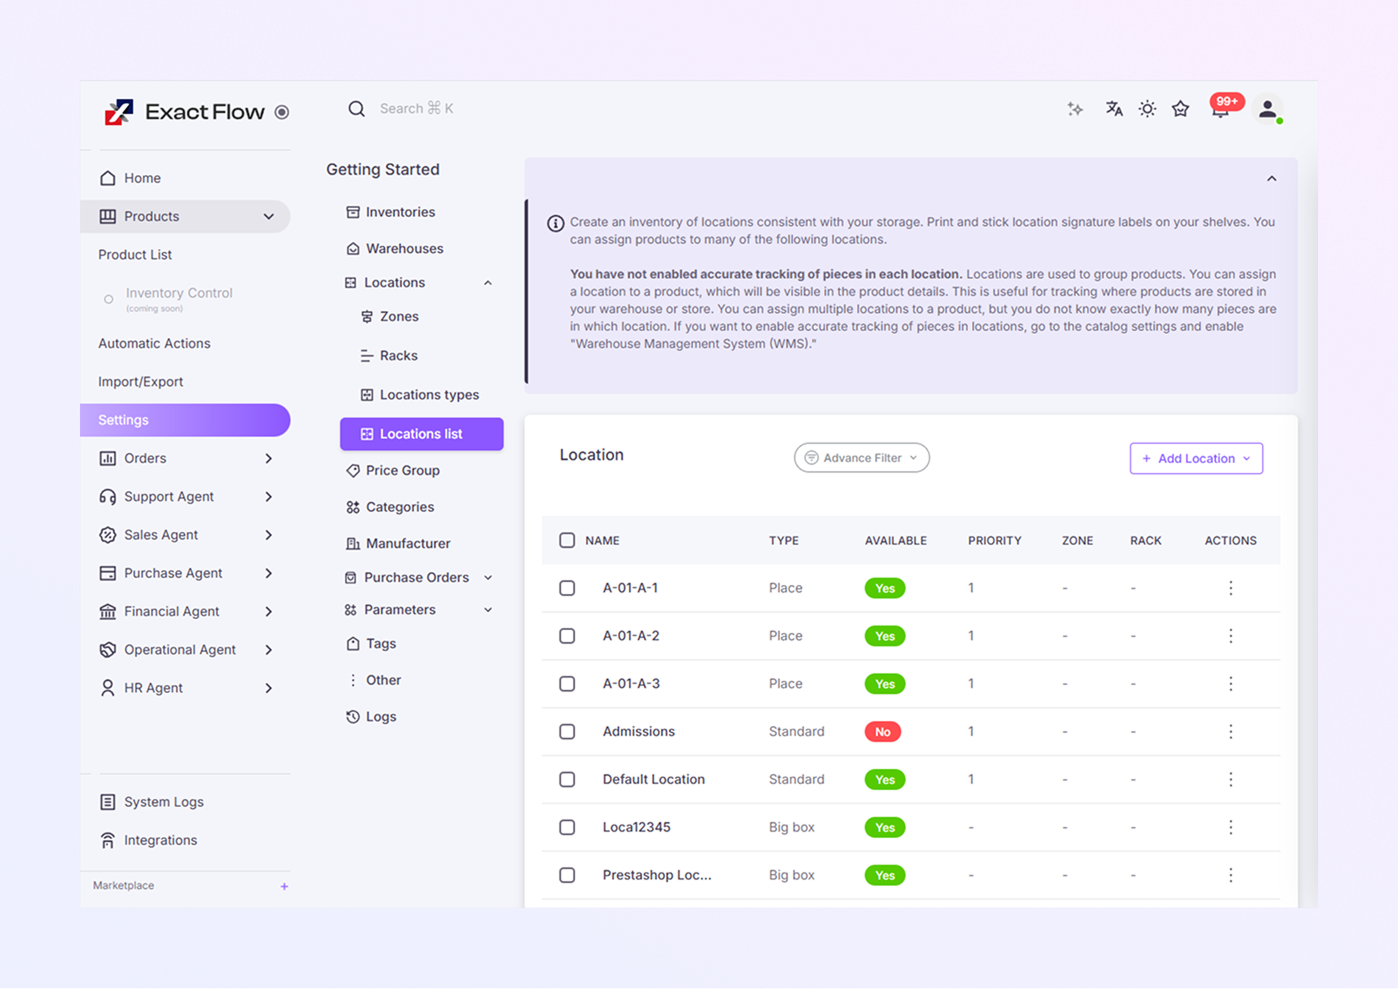
In the Location List Table, each row represents one location.
-
Name: Unique name of the location (example: A-01-A-1).
-
Type: Location type (Standard, Place, Big box, etc.)
-
Available: Indicates whether picking is allowed from this location (Yes/No).
-
Priority: Priority used during picking (1 = highest priority)
-
Zone: Zone where the location is placed.
-
Rack: The rack where the location is placed
-
Actions (⋮): Click the three dots to edit the location and delete the location.
-
Add a Single Location
-
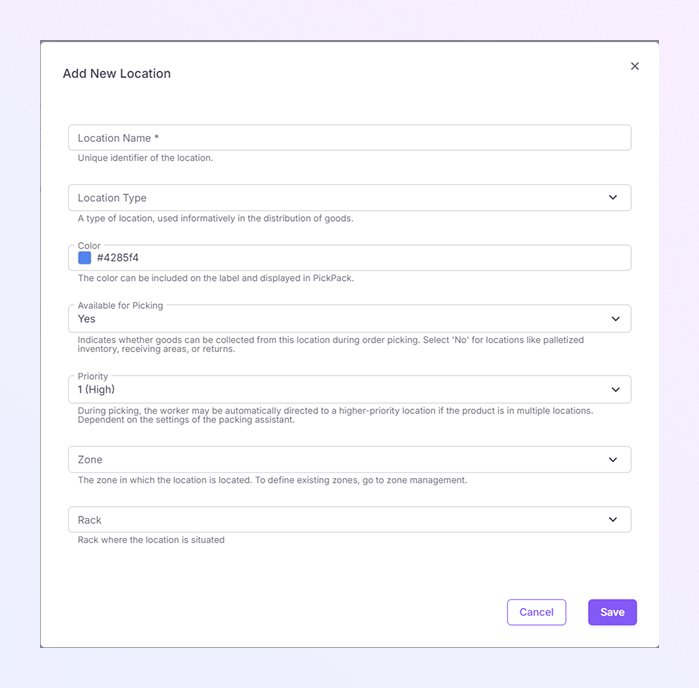
Click + Add Location (top-right), then Select Add Location. The Add New Location form opens.
-
Enter a unique Location Name * (Required). Recommended format: A-02-D-2 (alley-column-level-place).
-
Select a Location Type (Standard, Place, Big box, etc.).Used for organizing and capacity rules.
-
Choose a Color for the location label. This color is shown in PickPack and labels.
-
In Available for Picking, choose:
-
Yes: Products can be picked from this location.
-
No: Used for receiving, returns, or pallet storage.
-
-
In Priority, a Lower number = higher priority. Example: Priority 1 is picked first.
-
Select the Zone where this location exists.
-
Select the Rack where the location is placed.
-
Click Save, then the location appears in the Locations List, or click Cancel if you do not want to save.
Add Multiple Locations at Once
-
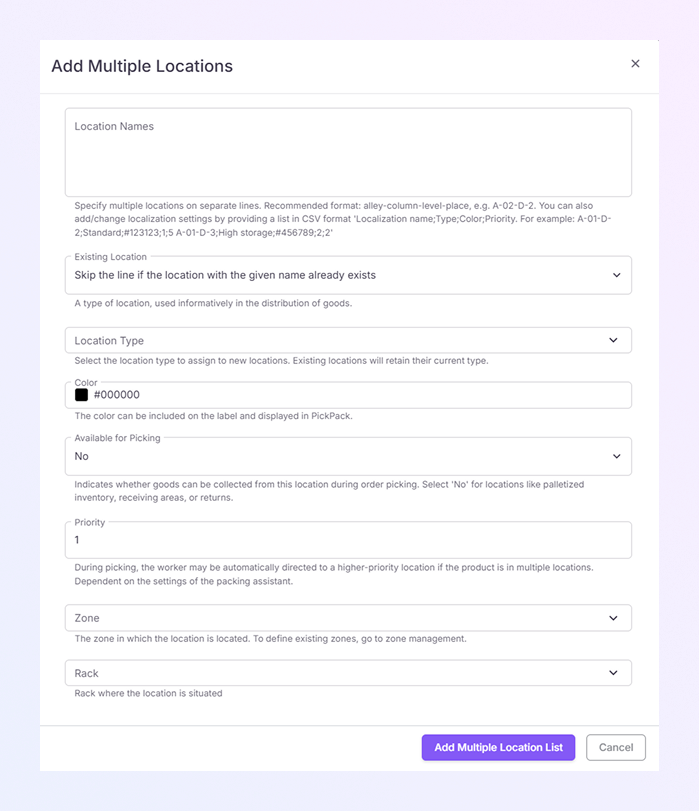
Click + Add Location (top-right), then Select Add Multiple Locations. The Add Multiple Location form opens.
-
Enter Location Names, one location per line. Recommended format: A-01-D-2 A-01-D-3
-
You can also use CSV format for advanced setup: Location name, Type, Color, Priority.
-
Existing Location Handling is a type of location used informatively in the distribution of goods. Choose from:
-
Update existing locations if they appear in the list.
-
Skip the line if the location with the given name already exists.
-
-
Select the Location Type to assign to new locations. Existing locations will retain their current type.
-
The Color can be included on the label and displayed in PickPack.
-
Available for Picking indicates whether goods can be collected from this location during order picking. Select 'No' for locations like palletized inventory, receiving areas, or returns.
-
Set Priority. During picking, the worker may be automatically directed to a higher-priority location if the product is in multiple locations. Dependent on the settings of the packing assistant.
-
Select the Zone in which the location is located. To define existing zones, go to zone management.
-
Select the Rack, where the location is situated.
-
Click Add Multiple Location List. Button, then all locations are added at once, or click Cancel to stop.
Use this option when you want to create many locations quickly.
-