

ExactFlow Logs Page User Guide
The Logs page shows a history of changes made in the ExactFlow system. It helps you track:
-
Who made a change
-
What was changed
-
When the change happened
-
Which setting or item was affected
This page is primarily used for tracking, auditing, and troubleshooting purposes.
-
Log in to your ExactFlow account.
-
From the left menu, click Settings.
-
Scroll down and click Logs.
-
Top Navigation
-
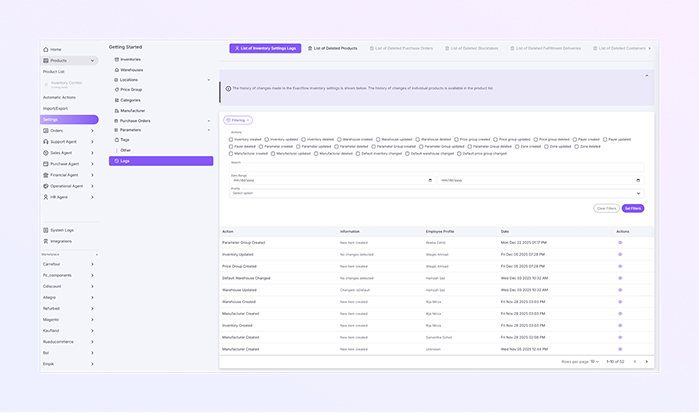
At the top of the page, you will see multiple log categories. Each category shows logs for a specific type of action.
-
Available Log Lists:
-
List of Inventory Settings Logs: Shows changes made in inventory settings.
-
List of Deleted Products: Shows products that were permanently deleted.
-
-
Click any tab to view logs related to that category.
-
-
List of Inventory Settings Logs
-
Information Banner
-
This page shows the history of changes made to inventory and system settings.
-
Product-specific change history is available inside the Product List.
-
Filtering Section
-
The Filtering section helps you find specific log entries quickly. Click Filtering to expand or collapse the filter options.
-
You can filter logs based on specific actions by checking the boxes.
-
Available Action Filters
-
Inventory created/updated/deleted
-
Warehouse created/updated/deleted
-
Price group created/updated/deleted
-
Parameter created/updated/deleted
-
Parameter group created/updated/deleted
-
Manufacturer created/updated/deleted
-
Default inventory changed
-
Default warehouse changed
-
Default price group changed
-
Zone created/updated/deleted
-
Payer created/updated/deleted
-
-
You can select one or multiple actions at the same time.
-
In the Date Range Filter, you can select a start date and an end date. It helps you view logs from a specific time period. Format shown: mm/dd/yyyy.
-
In the Profile Filter, you can use this to filter logs by employee profile. Example: See actions done by a specific user.
-
Apply selected filters by the Set Filters button, or remove all filters and show all logs by the Clear Filters button.
-
Logs Table
-
This table shows all recorded log entries.
-
Action: What action was performed? Example: “Parameter Group Created”, “Inventory Updated”
-
Information: Additional details about the action. Example: “New item created”, “No changes detected”
-
Employee Profile: Name of the user who acted.
-
Date: Date and time when the action occurred.
-
Actions (Eye Icon): Click to view more details about the log entry.
-
-
If you are viewing Log Details, then find a log entry in the list. Click the eye icon in the Actions column. A detailed view will open with more information. This is useful when you need exact change details.
-
At the bottom-right corner:
-
Rows per page
-
Choose how many logs appear per page
-
-
-
Page numbers
-
Move between the pages of logs
-
-
Shows current range (example: 1–10 of 52)
A message appears at the top explaining:
This helps users understand what type of logs are shown here.
-
How to Open the Logs Page
You will now see the Logs page.
List of Deleted Products
-
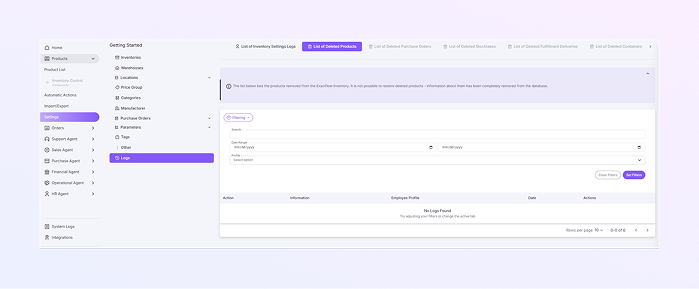
Information Banner
Below the tabs, you may see an information message. This means:
-
The log is for reference only
-
Deleted items cannot be recovered
-
Data is kept only for tracking and auditing
-
-
Filtering Section
-
Click the Filtering button. Filter options will appear.
-
In the Search bar, type a keyword to search logs. It is useful for finding a product name or action.
-
In Date Range, select a start date and an end date. It helps find actions done within a specific time.
-
In Profile, select an employee profile to show actions done by a specific user.
-
Apply selected filters by the Set Filters button, or remove all filters and show all logs by the Clear Filters button.
-
-
Logs Table
-
The table displays the filtered logs.
-
Action: What happened (e.g., product deleted)
-
Information: Details about the action
-
Employee Profile: The user who performed the action
-
Date: When the action happened
-
Actions: Additional options (if available)
-
-
At the bottom-right corner:
-
Change how many log entries appear per page.
-
The default is 10 rows per page.
-
-