

ExactFlow Ticket Page User Guide
The Tickets Page is where support teams view, assign, prioritize, and resolve customer tickets. It combines AI automation with human control to make ticket handling faster and smarter.
How to Open the Tickets Page
Log in to your ExactFlow account.
From the left sidebar, click Support Agent.
Click Tickets.
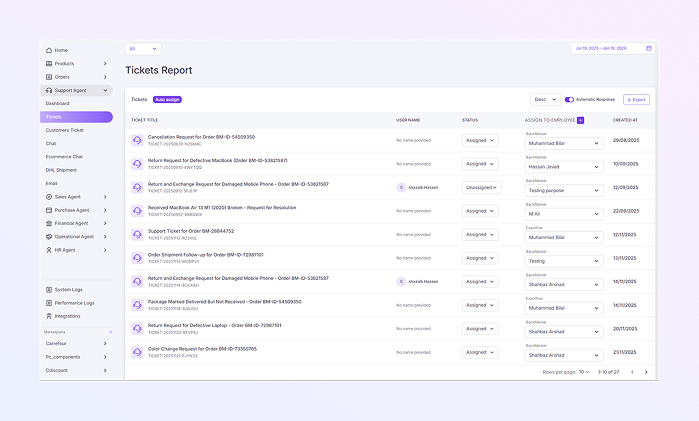
The Tickets Report page will open.
Page Overview
The Tickets Page has two main sections:
-
Tickets Report: Active and open tickets
-
Completed Tickets Report: Resolved tickets
The system uses AI + human decision-making to manage tickets efficiently.
Tickets Report
This section displays all open and active tickets that still require attention.
Top Controls & Filters
-
From the top dropdown menu, you can select:
-
All: To view data from all marketplaces.
-
Specific Marketplace: Choose a specific marketplace, such as:
-
Backmarket
-
Amazon
-
Pixmania
-
Refurbed
-
Others
-
-
-
This filter shows tickets only from the selected marketplace.
-
You can also choose a date range to specify the time period for which you want to view data.
-
Tickets will update to show information based on the selected marketplace and time period.
Ticket Tabs
-
Tickets: Displays all open tickets.
-
Auto Assign: Enables AI-based automatic ticket assignment.
Sorting Option
-
Sort tickets by Newest & Oldest. Helps you prioritize work.
Automatic Response Toggle
-
Turn automatic replies ON or OFF.
-
When ON, customers receive instant acknowledgment messages.
Export Button
-
Click Export to download ticket data. Useful for reporting and performance review.
AI Agent Role
-
Automatically assigns tickets to support agents
-
Helps ensure no ticket is overlooked
-
Analyzes ticket age, status, and workload
-
Suggests which tickets need immediate attention
-
Helps agents prioritize work efficiently.
Support Manager / Agent Role
-
Can manually change the assignee.
-
Have full control over ticket ownership.
-
Can override AI decisions anytime.
Tickets Table
Each row represents one customer support ticket.
-
Ticket Title: Short description of the issue.
-
Includes the Ticket ID below the title.
-
Click to open full ticket details.
-
-
User Name: Name of the customer (if provided).
-
Status: Displays the current state of the ticket and can be updated using the dropdown menu.
-
Unassigned: No agent assigned yet
-
Assigned: Ticket assigned to an agent
-
In progress: The agent is actively working on the issue.
-
Completed: Issue resolved (shown in completed section)
-
-
Assign to Employee: Select an agent from the dropdown list.
-
Shows the marketplace name above the employee name.
-
Allows managers to assign tickets manually.
-
-
Created At: Date when the ticket was created. Helps track ticket age and priority.
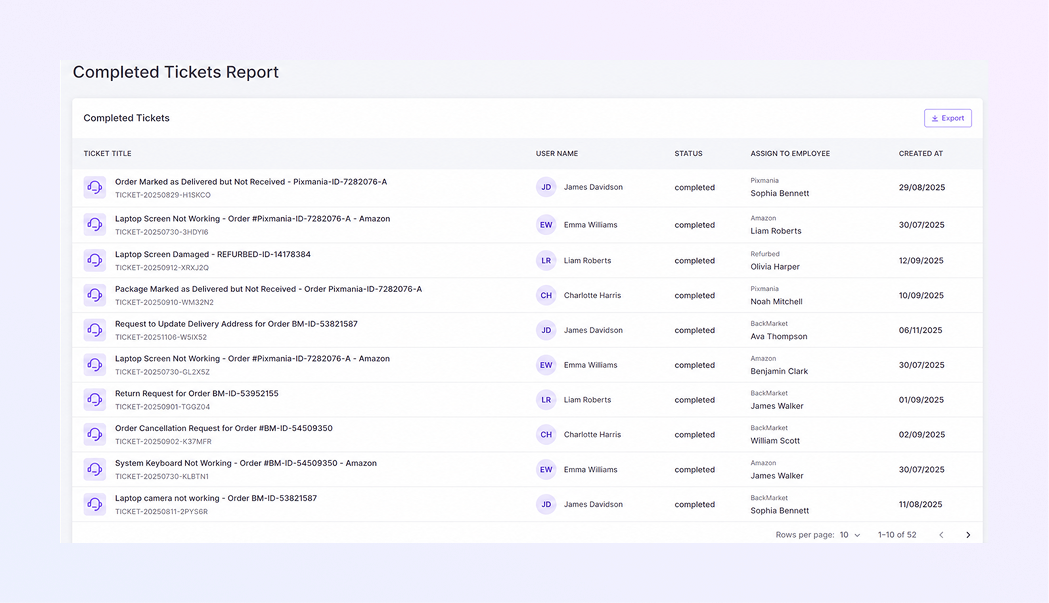
Completed Tickets Report
This section shows tickets that are fully resolved and closed.
Completed Tickets Table
-
Ticket Title: Issue description
-
User Name: Customer name
-
Status: Always shows Completed
-
Assign to Employee: Employee who resolved the ticket
-
Created At: Ticket creation date
Export Completed Tickets
-
Click Export in this section
-
Download completed ticket records for:
-
Reports
-
Audits
-
Performance tracking
-
How to Assign and Prioritize Tickets
Auto-Assign Tickets Using AI
-
Open the Auto Assign tab.
-
Enable auto-assignment.
-
AI assigns tickets automatically.
-
AI highlights tickets needing urgent attention.
Manually Assign or Change an Agent
-
Locate the ticket.
-
Go to Assign to Employee.
-
Select a different agent.
-
Assignment updates instantly.
Prioritize Tickets
-
AI suggests priority based on:
-
Ticket age
-
Status
-
SLA risk
-
-
Agents can still decide the final priority.