


ExactFlow Shipment Page User Guide
The Shipment page in ExactFlow helps Purchase teams track supplier shipments from start to finish. You can create shipment records, monitor arrival dates, check received quantities, and add product details once goods arrive.
This page organizes and makes shipment information easy to follow, even for first-time users.
How to Open the Shipment Page
Sign in to your Exact Flow account.
From the left menu, open Purchase Agent.
Click Shipment.
You will now see the Upcoming Shipments screen.
Upcoming Shipments Overview
The Upcoming Shipments page shows all shipment invoices in one list. From here, you can quickly see what is arriving, what is delayed, and what has already been received.
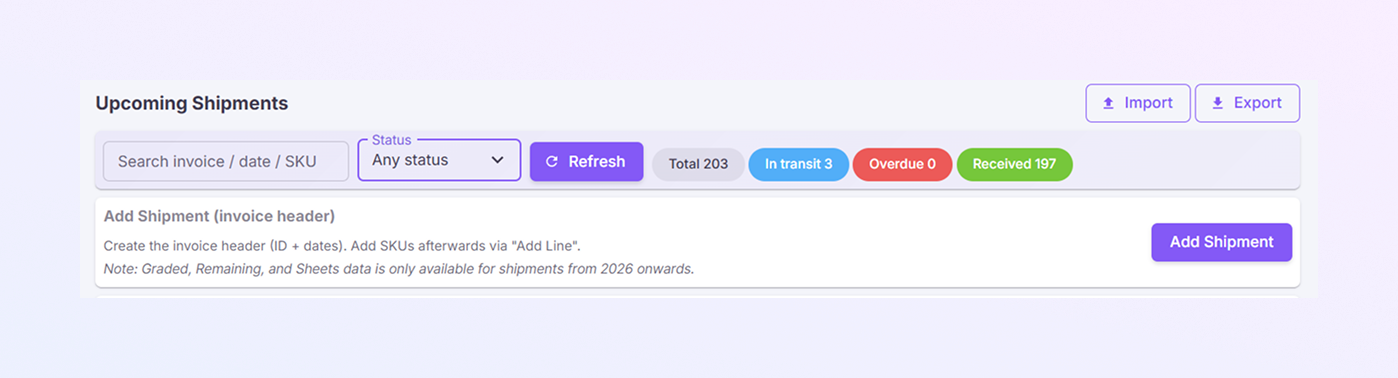
At the top of the page, you’ll find search tools, filters, and shipment summaries.
Search and Filter Options
-
Use the Search invoice/date / SKU field to find a shipment quickly. You can search by Invoice ID, Date, and SKU.
-
Use the Status dropdown to filter shipments by:
-
Any status
-
In transit
-
Received
-
Overdue
-
-
This helps you focus on only the shipments that matter right now.
-
Refresh Button: Click Refresh to reload the page and display the latest shipment data.
Shipment Status Summary
Next to the filters, you will see colored summary badges:
Total: Total number of shipments
In Transit: Shipments still on the way
Overdue: Shipments that passed the expected arrival date
Received: Shipments that have arrived
These numbers give a quick health check of all shipments.
Import Shipments
The Import button lets you upload multiple shipments at once.
Use Import when:
-
You receive many invoices together
-
You want to upload shipment data from a spreadsheet
-
You are adding historical shipment records
How Import Works:
-
Click Import
-
Upload the supported file.
-
ExactFlow reads the shipment details from the file.
-
Shipments appear in the Upcoming Shipments list.
Import saves time and reduces manual entry.
Export Shipments
The Export button allows you to download shipment data.
Export is useful for:
-
Reports and audits
-
Sharing shipment data with teams
-
Offline review and analysis
How Export Works:
-
Click Export.
-
Shipment data is downloaded as a file.
-
Open or share the file as needed.
Add Shipment
-
Click Add Shipment to create a new shipment record. This step creates the invoice header only. Product details are added later.
-
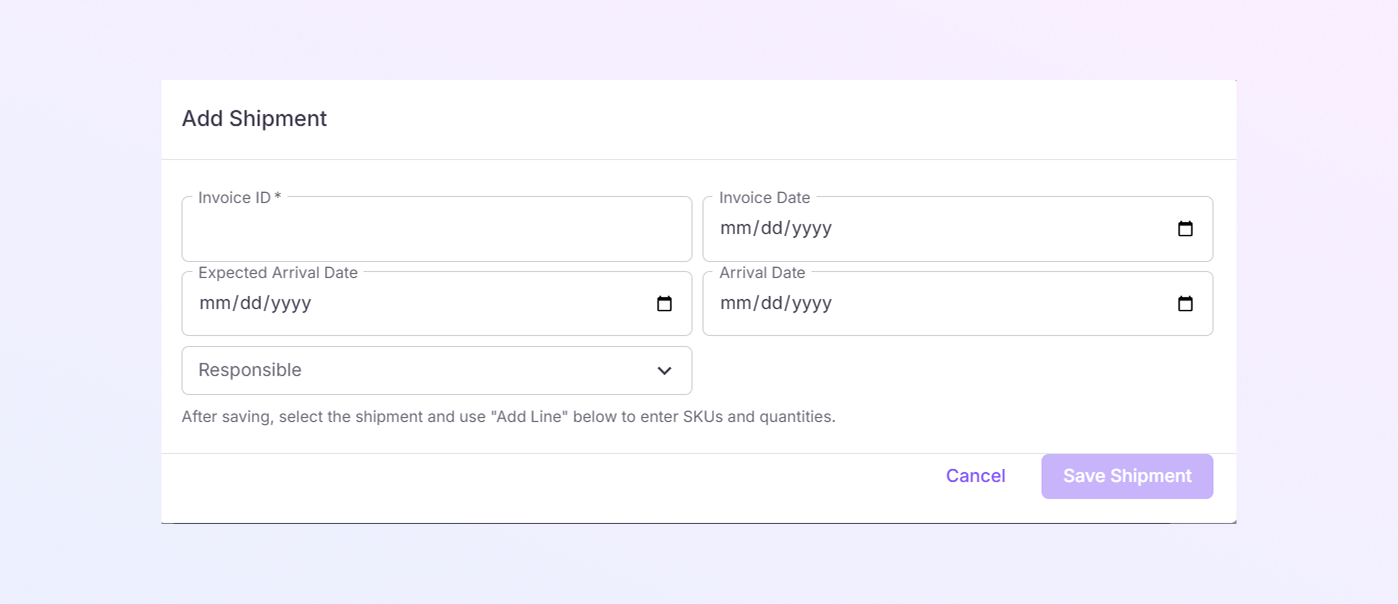
Invoice ID * is a required field. Enter the supplier’s invoice number. Each shipment must have a unique invoice ID for proper tracking.
-
Invoice Date: Select the date printed on the supplier invoice. This helps align shipment data with purchase and accounting records.
-
Expected Arrival Date: Select the date when the shipment is expected to arrive. This date is used to track delays, mark overdue shipments, and plan inventory availability.
-
Arrival Date: Enter the actual date when the shipment arrives. If the shipment has not arrived yet, you can leave this field empty and update it later.
-
Responsible: Choose the person or team responsible for this shipment. This helps assign ownership and ensures follow-ups happen on time.
-
Save or Cancel: Click Save Shipment to create the shipment or click Cancel to exit without saving.
-
Once saved, the shipment will appear in the Upcoming Shipments list.
-
After saving a shipment, select the shipment from the list. Scroll down to the Add Line section. Add SKUs and quantities using Add Line.
-
Shipment details and product details are managed separately to keep records clean.
Shipment List Table
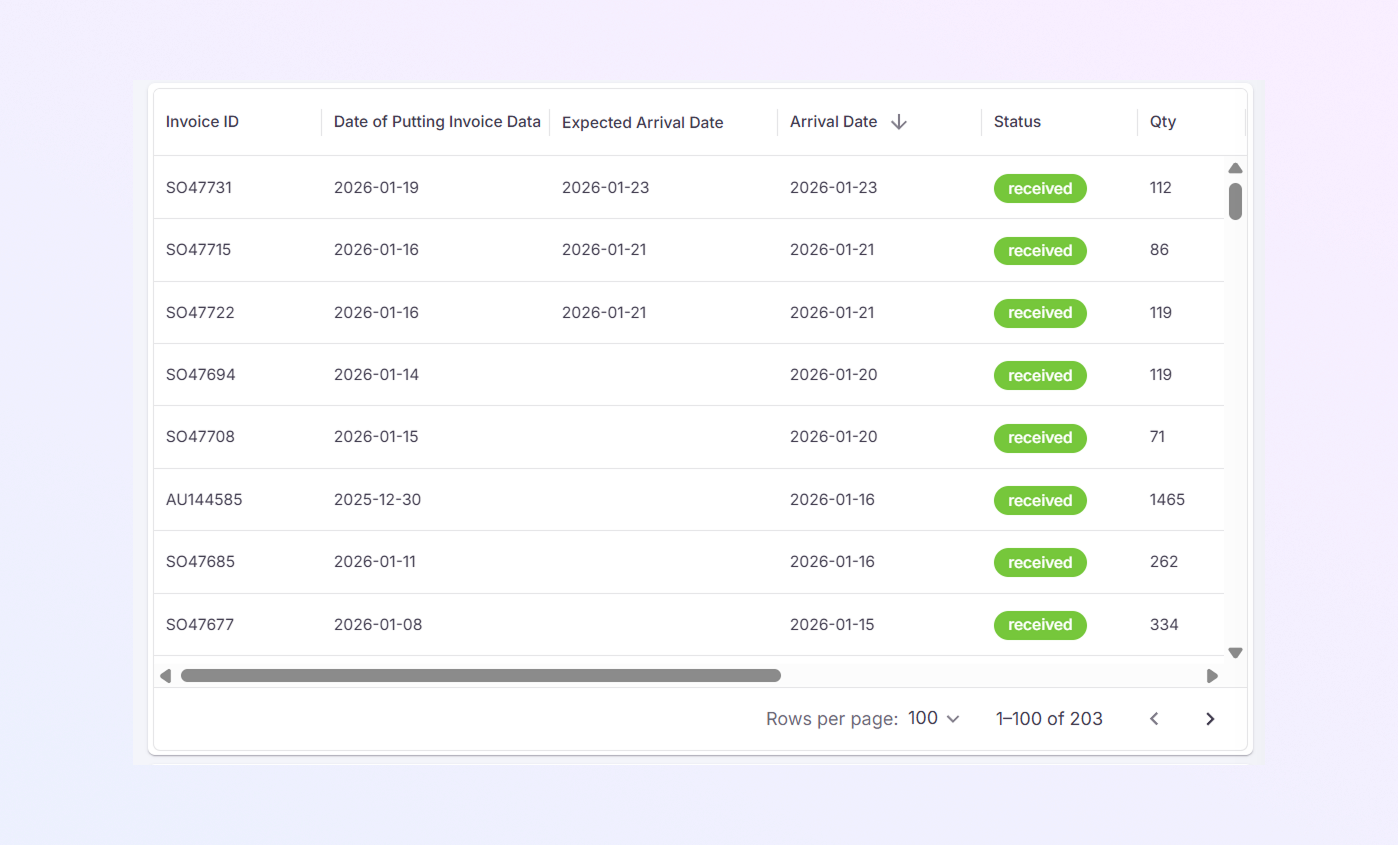
This table shows all saved shipments with their current status.
-
Invoice ID: Supplier invoice reference
-
Date of Putting Invoice Data: Date entered into ExactFlow
-
Expected Arrival Date: Planned arrival date
-
Arrival Date: Actual arrival date
-
Status: Shipment status (Received, In Transit, Overdue)
-
Qty: Total quantity in the shipment
-
Graded: Quantity already processed or graded
-
Remaining: Quantity still pending
-
Sheet: Number of linked documents or sheets
Green “Received” labels mean the shipment is fully received.
Shipment Line Details Section
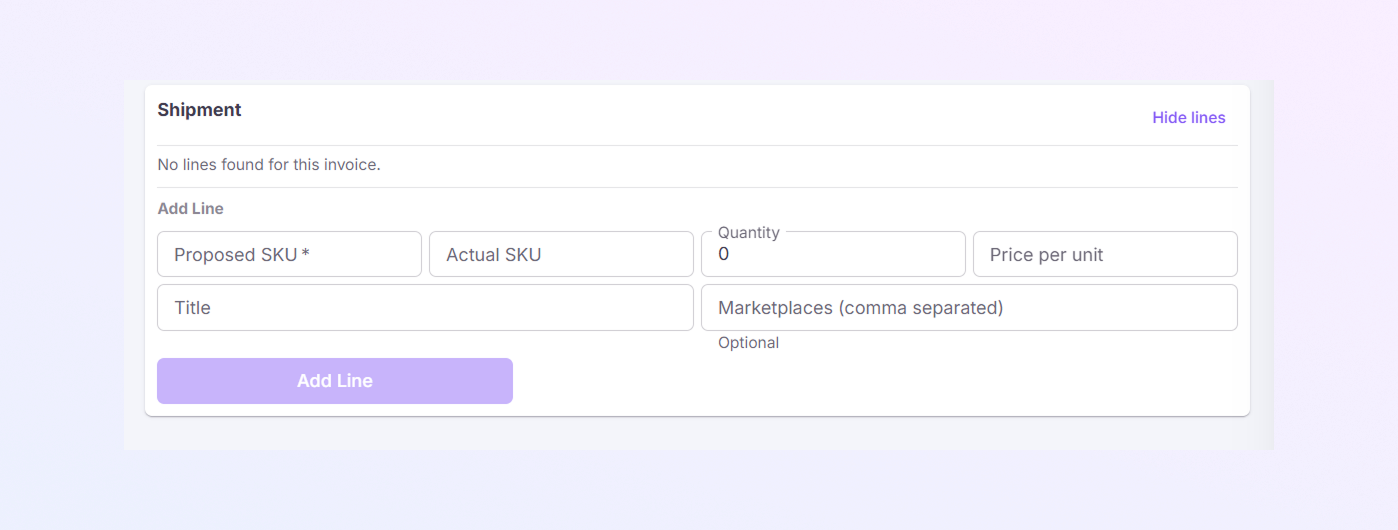
Below the shipment table is the Shipment section.
-
This area shows SKU-level details for the selected shipment.
-
Use the Add Line section to add SKUs to the shipment.
-
Proposed SKU*: Required SKU from the purchase plan
-
Actual SKU: SKU actually received, if different
-
Quantity: Number of units received
-
Price per unit: Cost per item
-
Title: Product name or description
-
Marketplaces (comma separated): Optional selling channels
-
-
Click Add Line to save the product entry.
When to Use the Shipment Page
Use this page to:
-
Track supplier shipments
-
Monitor expected vs actual arrival dates
-
Identify delayed or overdue shipments
-
Record received quantities
-
Add SKU and pricing details
-
Maintain clean purchase and inventory records